Goal
- Explore how to use Xcode Playgrounds for quick idea validation, lightweight assertion checks similar to a unit test, and small proof-of-concepts — without spinning up a full app target.
Project
Cheat Sheet
The things I wish I’d known before starting. Each is expanded in the Deep Dive below.
- After adding anything to a
Resources/folder, quit and relaunch Xcode. Until you do, lookups returnnilfor files that are plainly sitting there. This is a false negative on perfectly correct code, and it’s the single most likely reason an asset “doesn’t load”. - Loose files in
Resources/only work withUIImage(named:). SwiftUI’sImage("name")reads asset catalogs and nothing else. Put an asset in a catalog and both APIs find it. - A page has exactly one live view slot. Calling
setLiveView(_:)twice replaces the first view rather than adding a second, so compose everything into one container first. - A standalone
.playgroundcan’t import Swift packages. It needs a workspace or a package around it. System frameworks are fine - exceptAVKit, which fails to load. - The debug console doesn’t clear itself. Use the 🗑️ icon between runs or output from previous runs piles up.
- A playground inside a package is read-only, like everything else in that package.
- This article is about Xcode Playgrounds (
.playground), not the Swift Playgrounds app - the two are easy to confuse and behave differently.
Deep Dive
- Playgrounds are the fastest way to start writing code against an Apple API - no project, no target, no app to launch.
- They also make good documentation for a library you maintain: a README shows code, a playground lets someone run it. Note that a playground shipped inside a package is read-only, like everything else in that package.
Getting Started
Creating a playground
The official way to create a new playground is to open Xcode and go to “File → New → Playground” or ⌥⇧⌘N (i.e. OPT + SHIFT + CMD + N)
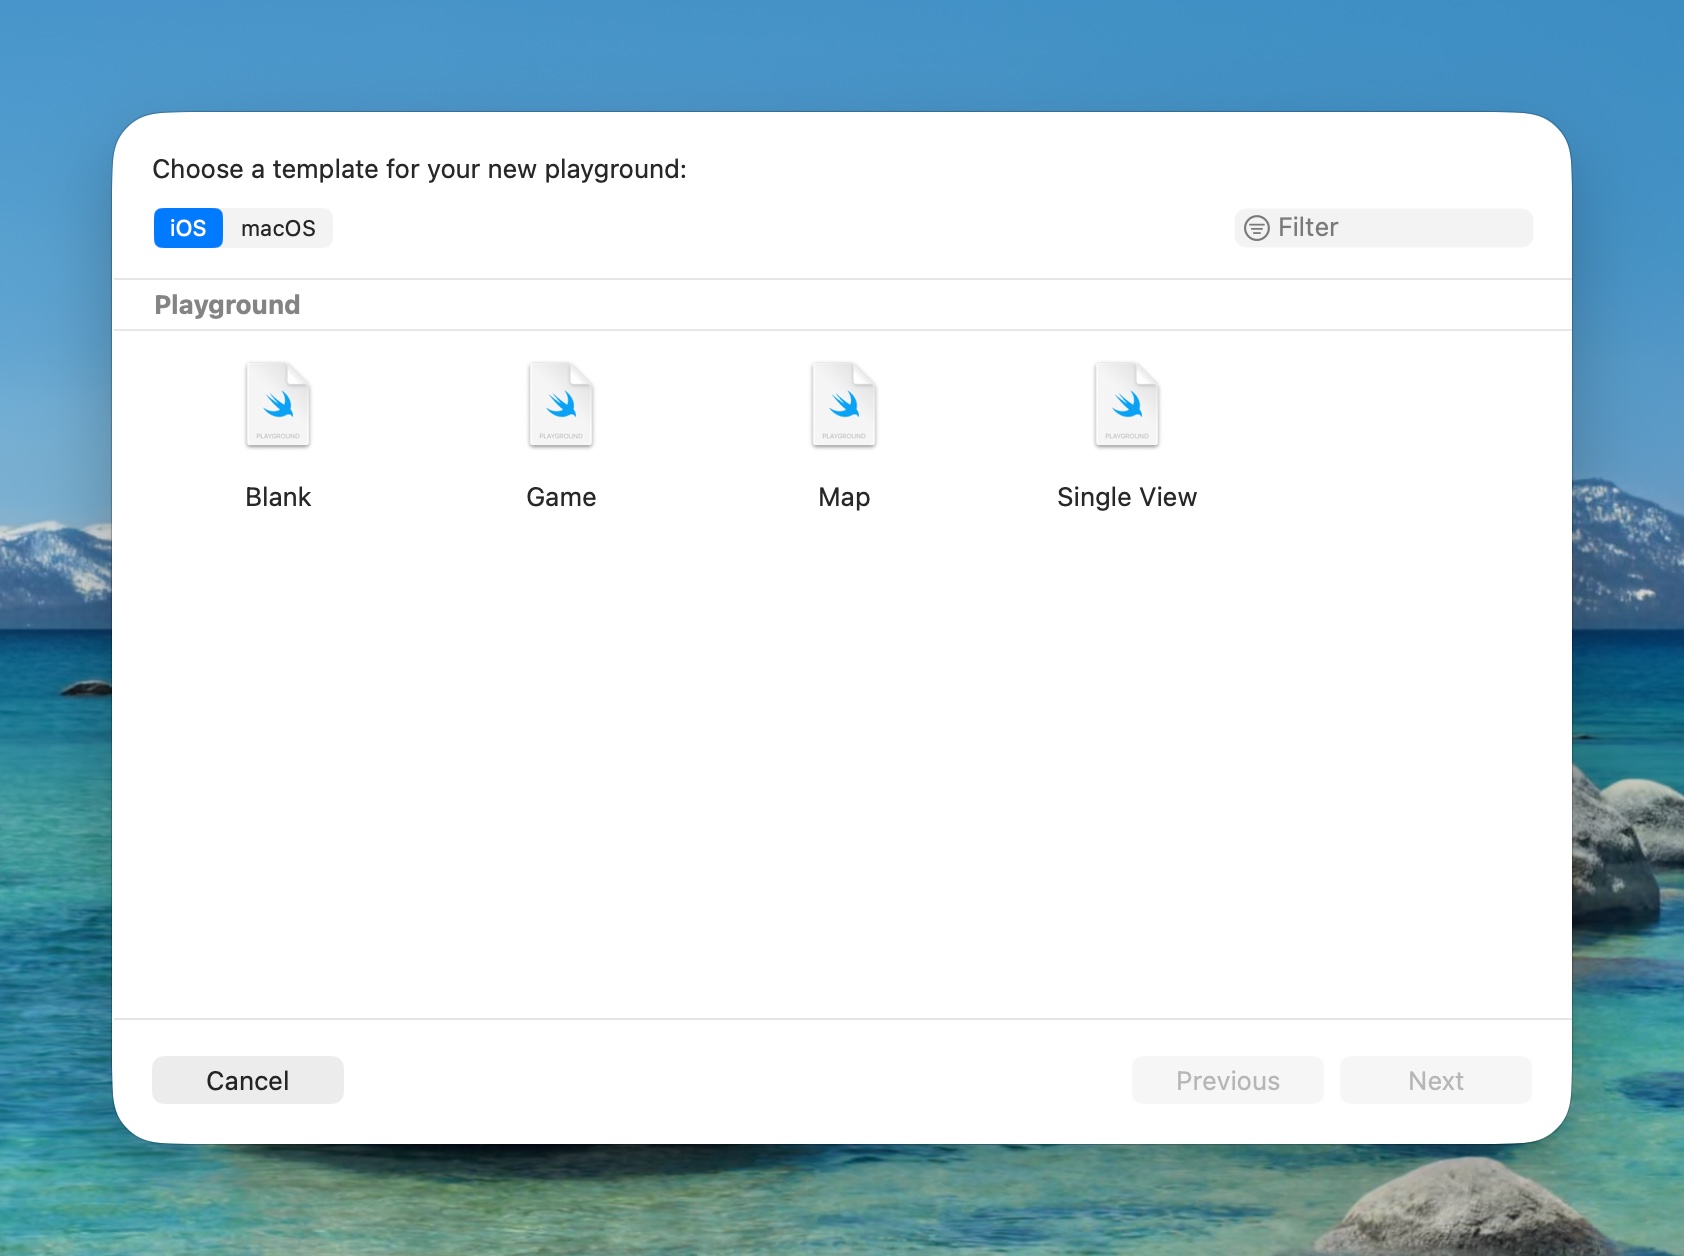
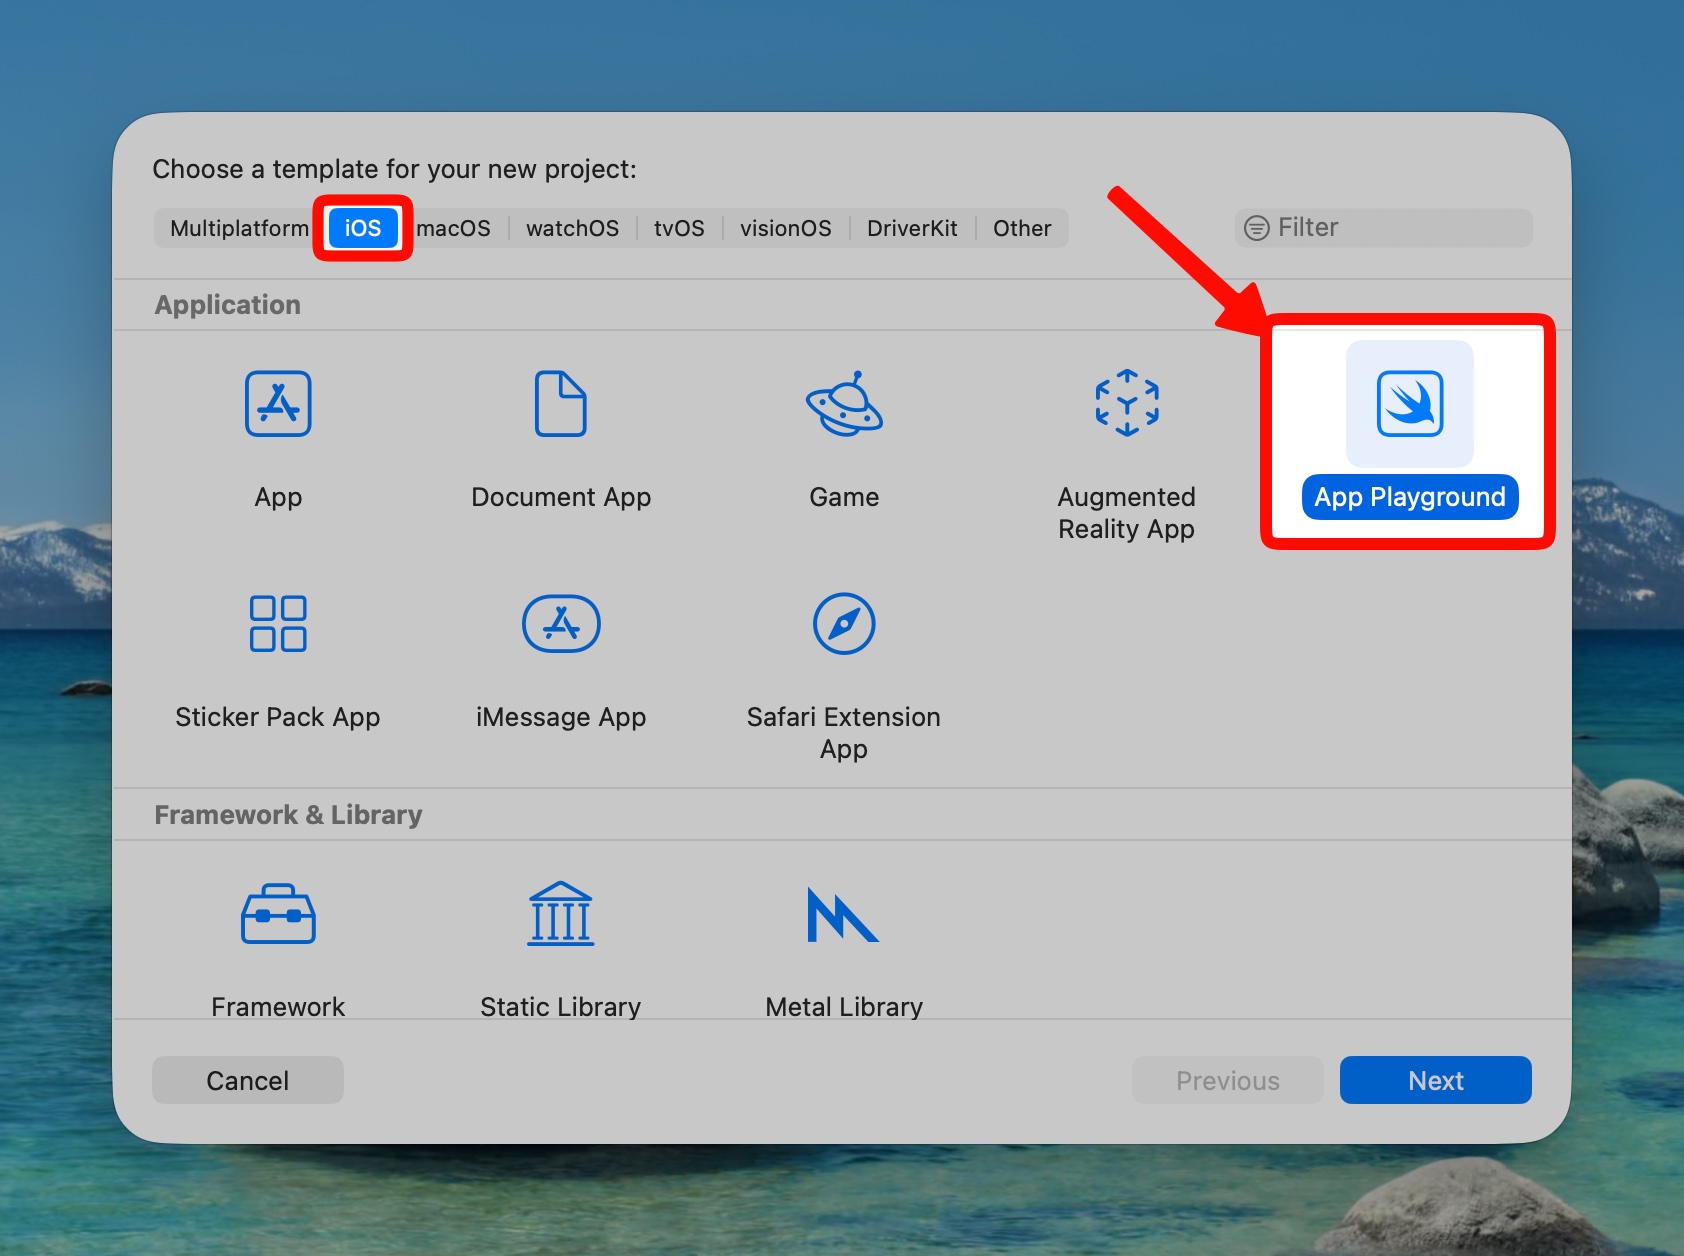
Note the Welcome screen offers no playground option at all, and the new-project window has an “App Playground” template that is not what you want here - that one builds an app for the Swift Playgrounds app, not a scratchpad:
Running and debugging code
To execute code, you can press the play button (▶︎) on the debug window or blue play button on the side bar or go to that line and press ⇧⏎ (i.e. Shift + Return)
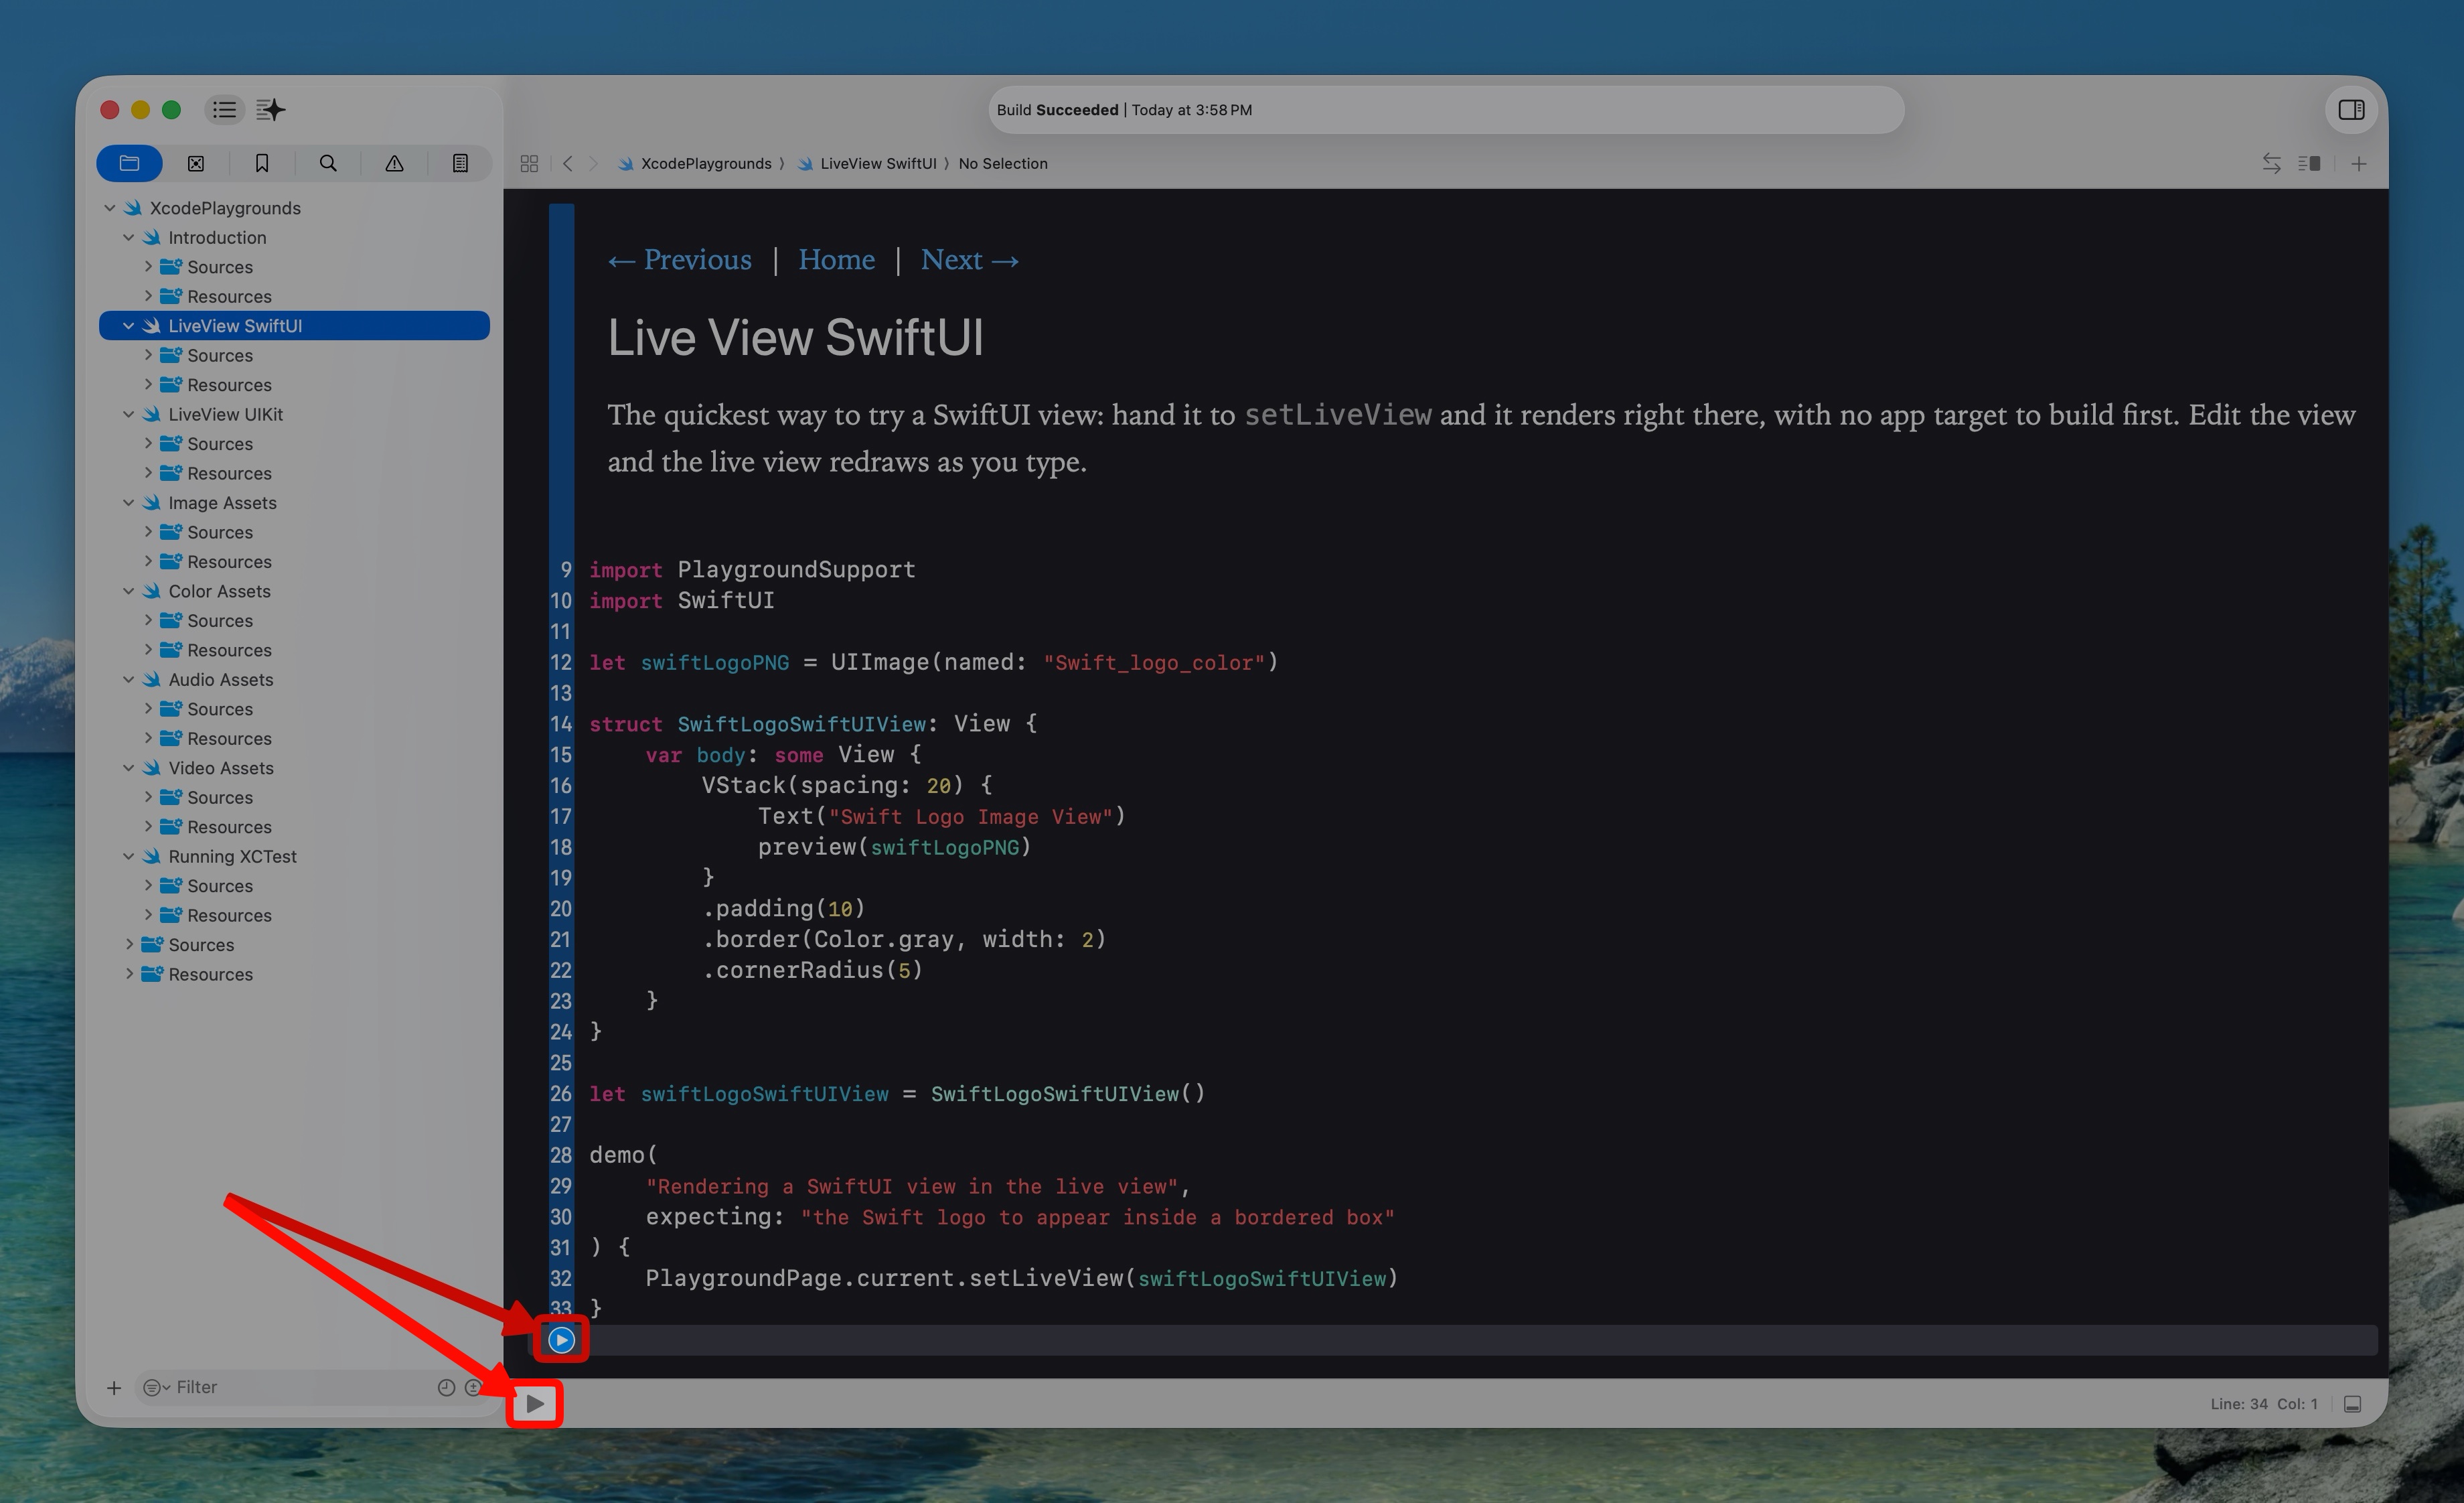
To stop the execution you can press the stop button (⏹) on the debug window.
By default, the running mode is set to automatic. You can change it to Manual by long pressing the play button and changing the selection to
Manually Run.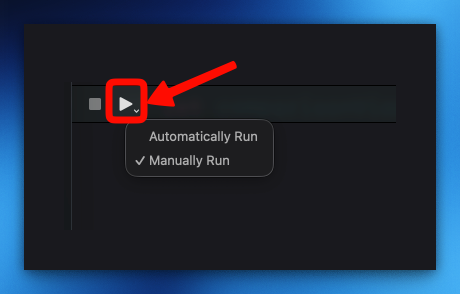
Playgrounds don’t support breakpoints. Instead you can press ⇧⏎ (i.e. Shift + Return) or click the blue execute button on the left side of the code line number to specify the current execution endpoint
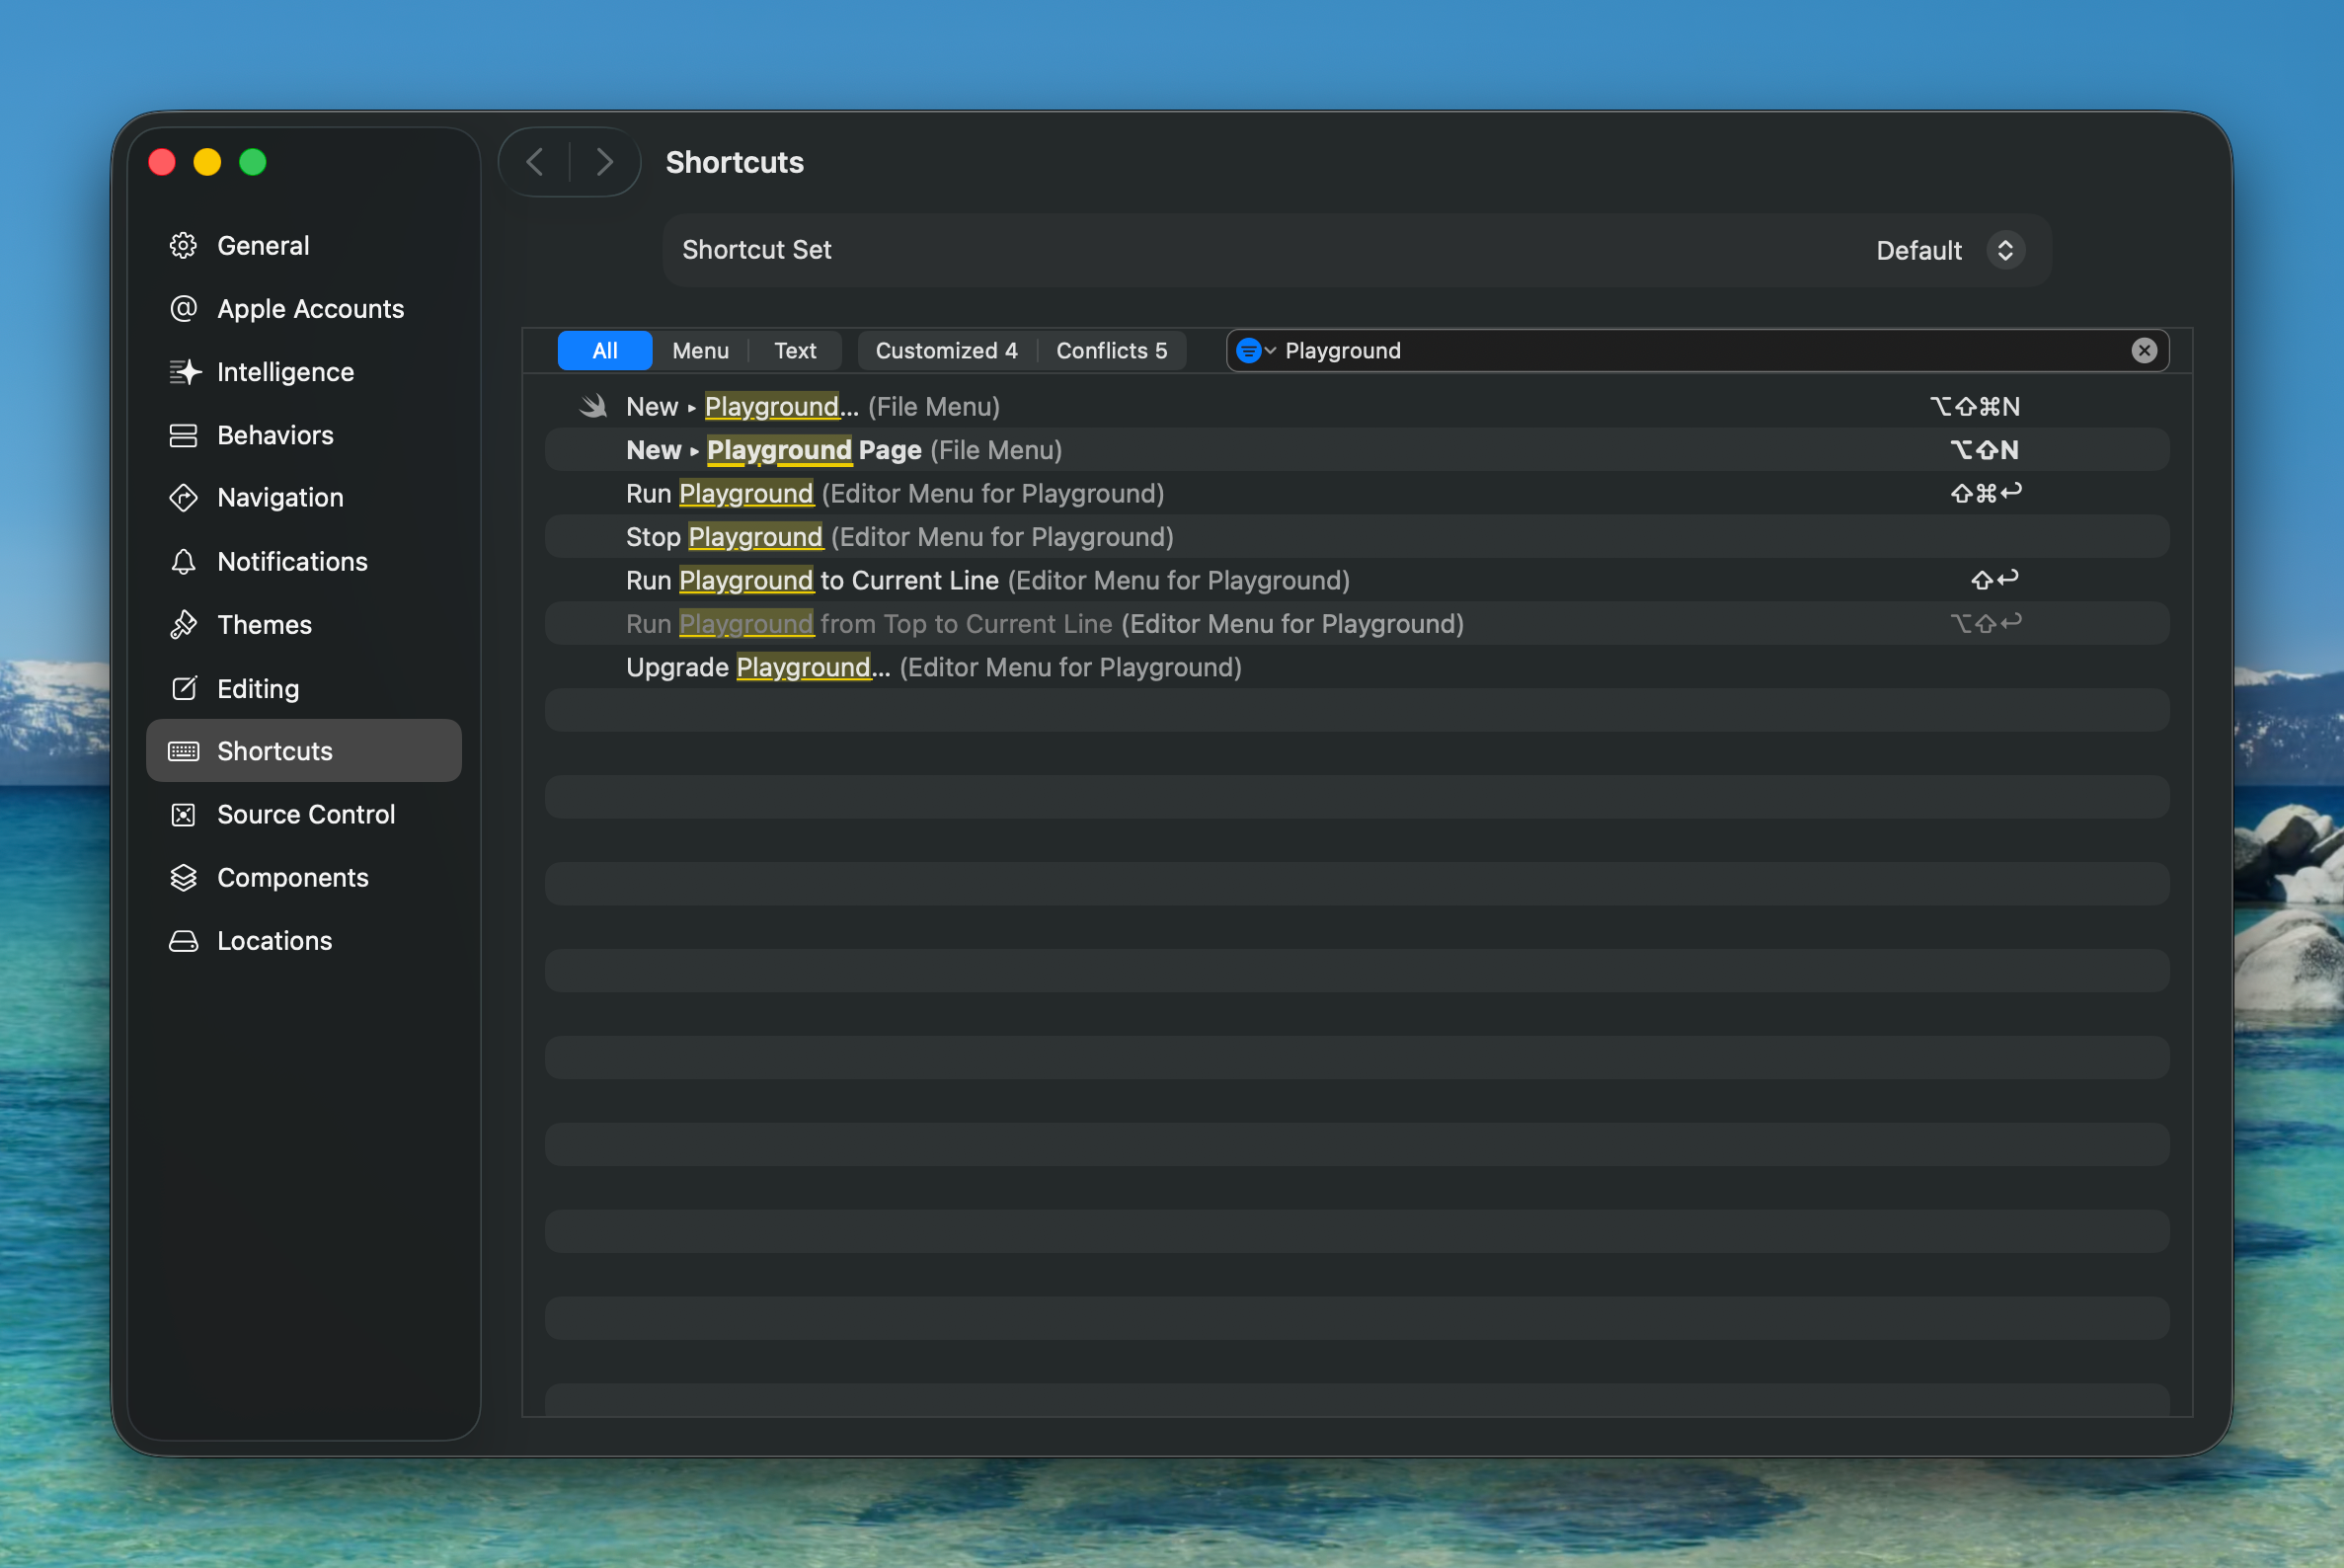
Assigning a few key bindings makes all of this considerably less tedious:
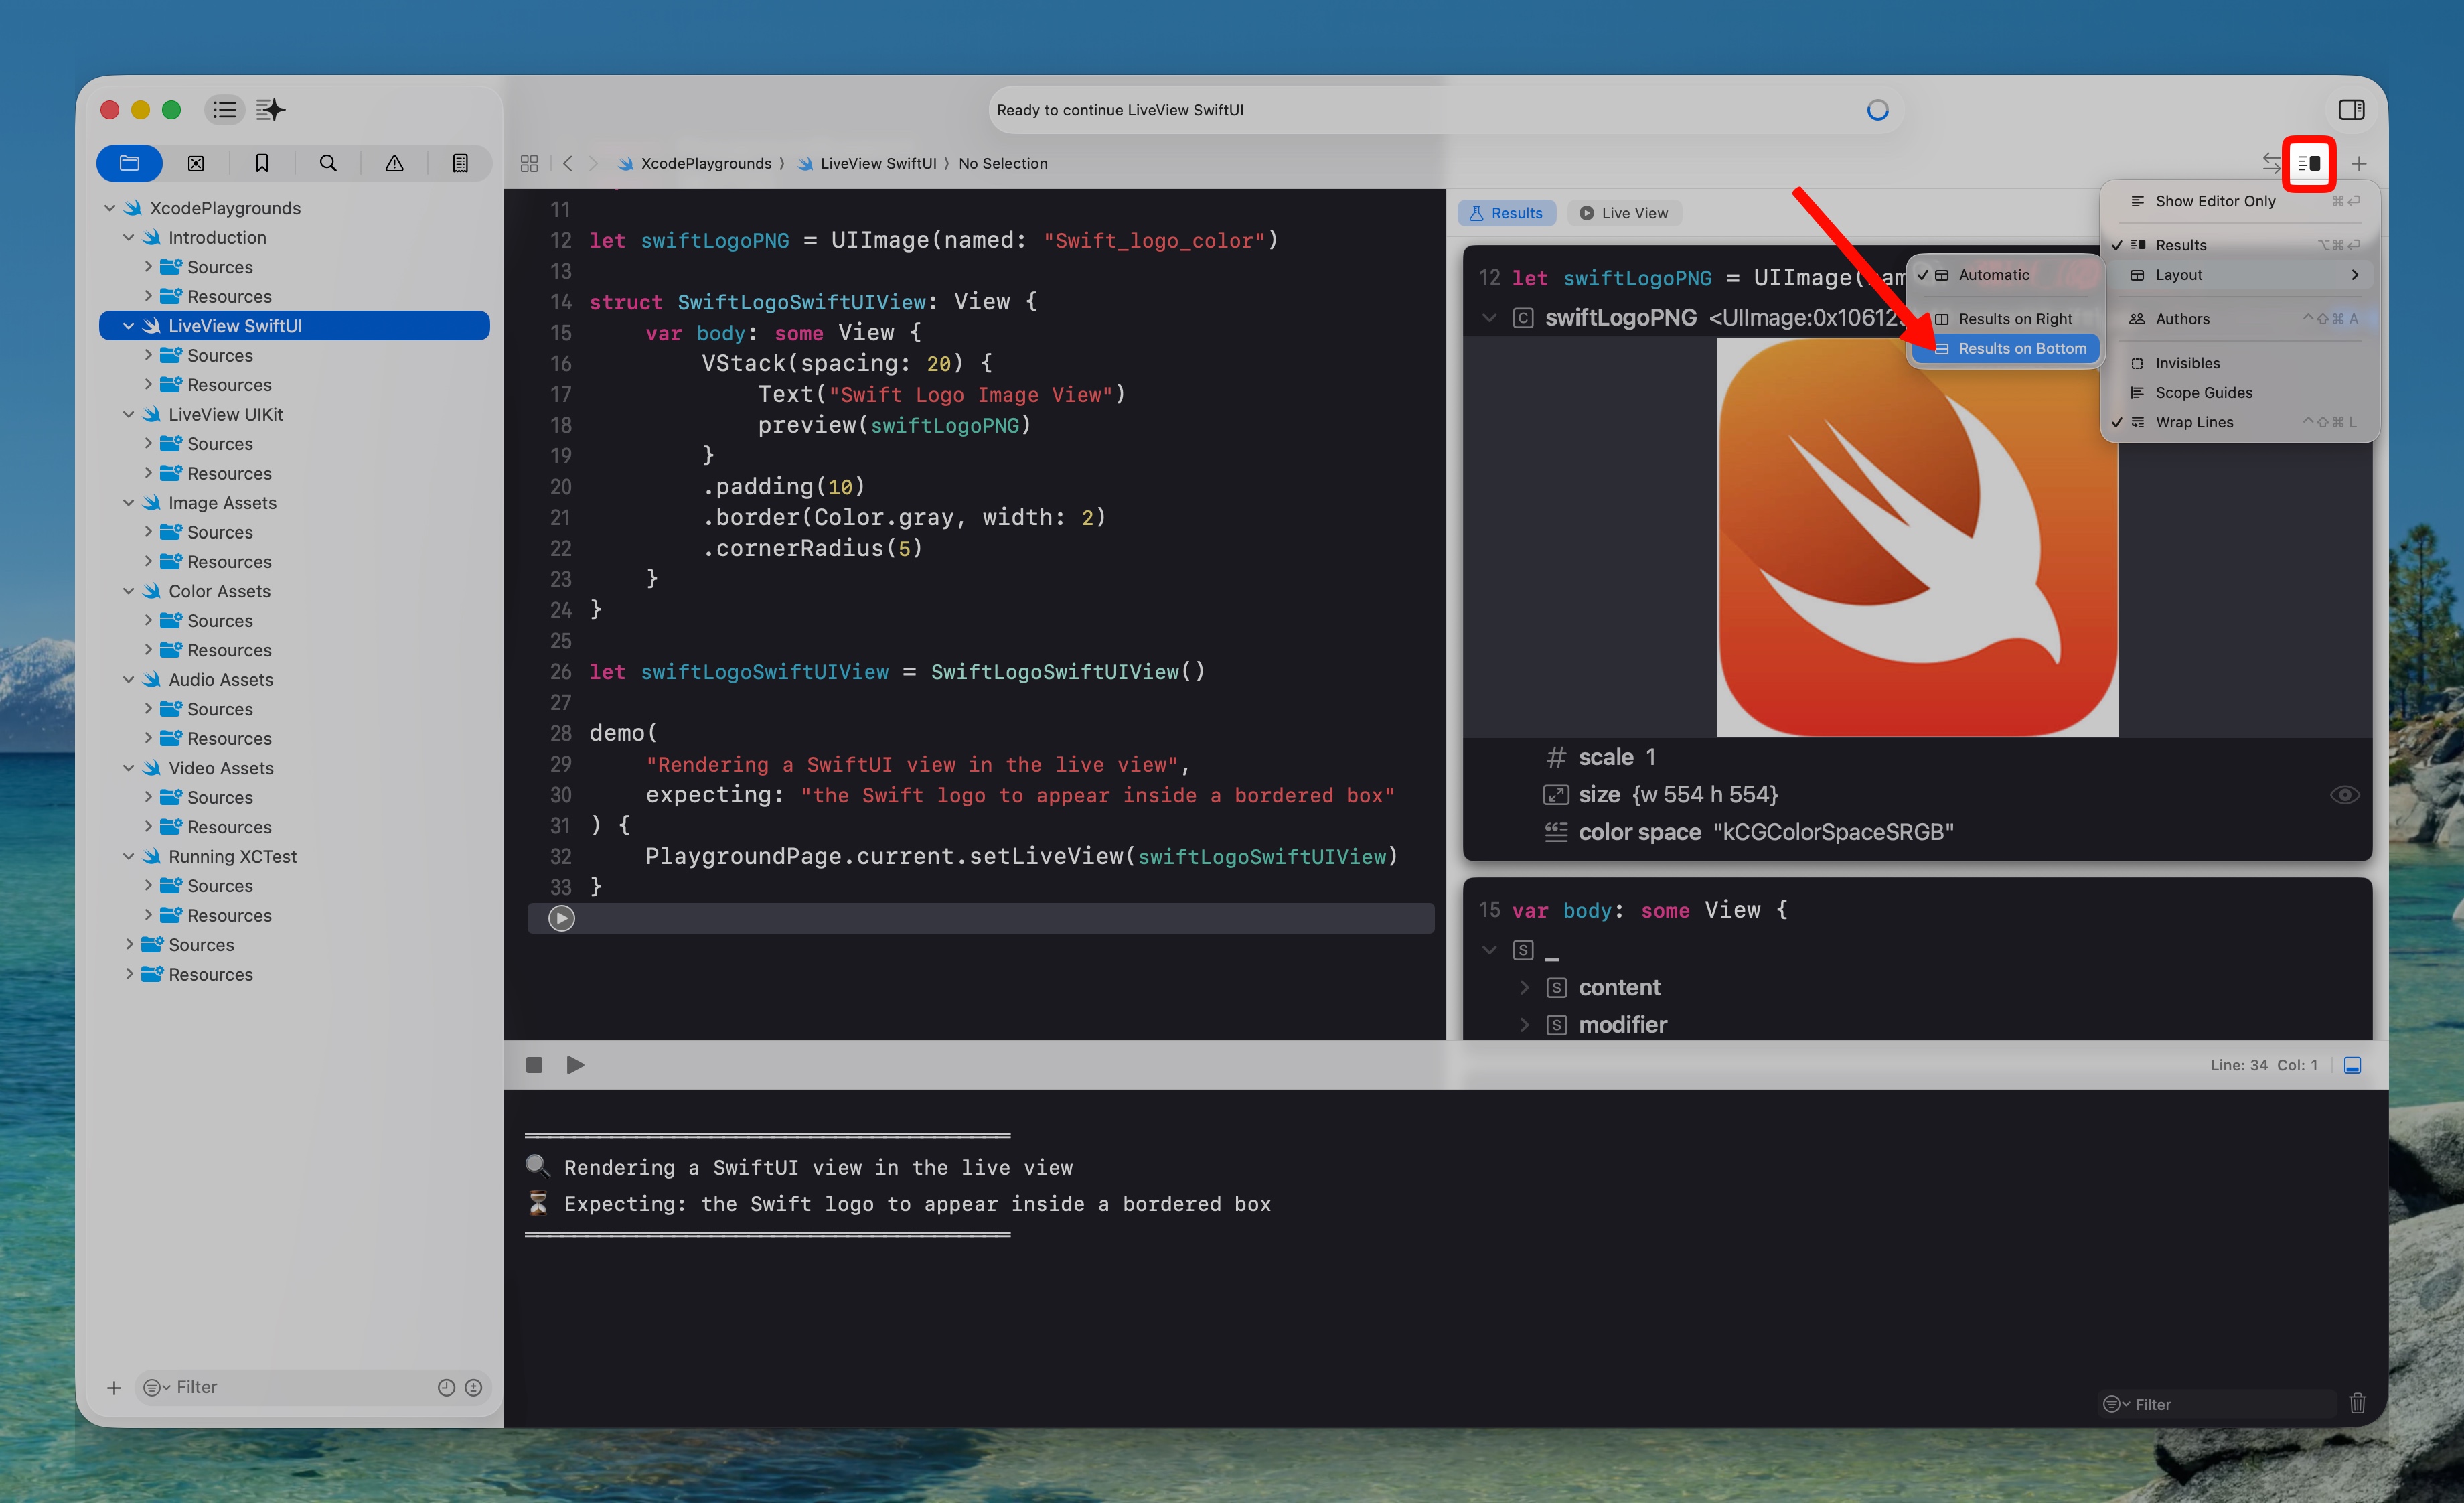
In Xcode Playgrounds, you can see the execution results of each line using the results pane. By default the results view is shown on the right and you can move it to down by using the layout option:
Adding a live view
A live view is how you get something interactive on screen - a view, a view controller, anything you want to poke at rather than just print.
Import
PlaygroundSupport, then assign toPlaygroundPage.current.liveViewfor UIKit or callPlaygroundPage.current.setLiveView()for SwiftUI.Here’s a SwiftUI view rendered in the live view:
import PlaygroundSupport import SwiftUI let swiftLogoPNG = UIImage(named: "Swift_logo_color") struct SwiftLogoSwiftUIView: View { var body: some View { VStack(spacing: 20) { Text("Swift Logo Image View") preview(swiftLogoPNG) } .padding(10) .border(Color.gray, width: 2) .cornerRadius(5) } } let swiftLogoSwiftUIView = SwiftLogoSwiftUIView() demo( "Rendering a SwiftUI view in the live view", expecting: "the Swift logo to appear inside a bordered box" ) { PlaygroundPage.current.setLiveView(swiftLogoSwiftUIView) }And the same thing in UIKit:
import PlaygroundSupport
	import UIKit

	let swiftLogoPNG = UIImage(named: "Swift_logo_color")

	final class SwiftLogoUIKitView: UIStackView {
	    private let titleLabel: UILabel = {
	        let label = UILabel()
	        label.text = "Swift Logo Image View"
	        label.textAlignment = .center
	        label.translatesAutoresizingMaskIntoConstraints = false

	        return label
	    }()

	    private let logoImageView: UIImageView = {
	        let imageView = UIImageView(image: swiftLogoPNG)
	        imageView.contentMode = .scaleAspectFit
	        imageView.translatesAutoresizingMaskIntoConstraints = false
	        imageView.widthAnchor.constraint(equalToConstant: 120).isActive = true
	        imageView.heightAnchor.constraint(equalToConstant: 120).isActive = true

	        return imageView
	    }()

	    override init(frame: CGRect) {
	        super.init(frame: frame)
	        configure()
	    }

	    required init(coder: NSCoder) {
	        super.init(coder: coder)
	        configure()
	    }

	    private func configure() {
	        axis = .vertical
	        spacing = 10

	        isLayoutMarginsRelativeArrangement = true
	        layoutMargins = UIEdgeInsets(top: 10, left: 10, bottom: 10, right: 10)

	        backgroundColor = .white
	        layer.borderColor = UIColor.gray.cgColor
	        layer.borderWidth = 2
	        layer.cornerRadius = 5
	        clipsToBounds = true

	        addArrangedSubview(titleLabel)
	        addArrangedSubview(logoImageView)
	    }
	}

	let swiftLogoUIKitView = SwiftLogoUIKitView(
	    frame: .init(x: 0, y: 0, width: 200, height: 170)
	)

	demo(
	    "Rendering a UIKit view in the live view",
	    expecting: "the Swift logo to appear inside a bordered stack view"
	) {
	    PlaygroundPage.current.liveView = swiftLogoUIKitView
	}
Using assets and resources
- There are two places an asset can live: loose in a
Resources/folder, or inside an Asset Catalog. Which one you pick matters more than you’d expect, because the answer changes per asset type - and per API.
| Asset type | Loose in Resources/ | Asset Catalog |
|---|---|---|
| Image | UIImage(named:) only | UIImage(named:) and Image("name") |
| Color | not possible | UIColor(named:) and Color("name") |
| Audio | Bundle.main.url(forResource:withExtension:) | NSDataAsset |
| Video | Bundle.main.url(forResource:withExtension:) | NSDataAsset, then written to a temp file |
Image assets
UIImage(named:)picks up a loose.pngby name alone, but a loose.jpeg/.jpgneeds the extension spelled out in the name string. Worth flagging, because the widely-repeated behavior is that since iOS 4 the extension is optional andUIImageinfers the format from whatever’s in the bundle. In a playground it didn’t: the bare name resolved for PNG and returnednilfor JPEG.- A loose
.svgnever loads. SVG only renders through an Asset Catalog with “Preserve Vector Data” enabled, because there’s no runtime SVG rasterizer to fall back on. - Everything in an Asset Catalog resolves through both
UIImage(named:)and SwiftUI’sImage("name"). Loose files only work withUIImage(named:)-Image("name")reads asset catalogs and nothing else, so it never sees them.import UIKit import SwiftUI import PlaygroundSupport let pngFromResources = UIImage(named: "Swift_logo_color") // works - no extension needed for PNG let jpegFromResources = UIImage(named: "Swift_logo_color_jpeg") // nil - fails without the extension let jpegFromResourcesWithExt = UIImage(named: "Swift_logo_color_jpeg.jpeg") // works - extension included let svgFromResources = UIImage(named: "Swift_logo_color_svg.svg") // nil - no runtime SVG decoder let pngFromResourcesAsImage = Image("Swift_logo_color") // empty - Image() only reads asset catalogs let pngFromCatalog = UIImage(named: "Swift_logo_color_asset_catalog") // works let pngFromCatalogAsImage = Image("Swift_logo_color_asset_catalog") // works let jpegFromCatalogAsImage = Image("Swift_logo_color_jpeg_asset_catalog") // works let svgFromCatalogAsImage = Image("Swift_logo_color_svg_asset_catalog") // works struct AssetComparisonSwiftUIView: View { var body: some View { HStack(spacing: 20) { VStack(spacing: 20) { Text("Resources folder") .font(.callout) .bold() .underline() .foregroundStyle(.red) Text("✅ UIImage: PNG, no extension").font(.headline) preview(pngFromResources) Text("❌ UIImage: JPEG, no extension").font(.headline) preview(jpegFromResources) Text("✅ UIImage: JPEG with extension").font(.headline) preview(jpegFromResourcesWithExt) Text("❌ UIImage: SVG").font(.headline) preview(svgFromResources) Text("❌ Image: PNG").font(.headline) preview(pngFromResourcesAsImage) } Divider() VStack(spacing: 20) { Text("Asset Catalog") .font(.callout) .bold() .underline() .foregroundStyle(.green) Text("✅ UIImage: PNG").font(.headline) preview(pngFromCatalog) Text("✅ Image: PNG").font(.headline) preview(pngFromCatalogAsImage) Text("✅ Image: JPEG").font(.headline) preview(jpegFromCatalogAsImage) Text("✅ Image: SVG").font(.headline) preview(svgFromCatalogAsImage) } } .padding(10) .border(Color.gray, width: 2) .cornerRadius(5) } } demo( "Loading images from Resources/ and from an Asset Catalog", expecting: "every catalog image to load; from Resources/ only the UIImage lookups, and JPEG only with its extension" ) { PlaygroundPage.current.setLiveView(AssetComparisonSwiftUIView()) }
Color assets
- Unlike images, a color can’t live as a loose file - there’s no such thing as a standalone color file to drop into
Resources/. A colorset only exists inside an Asset Catalog, so the Resources-vs-Catalog comparison doesn’t apply. - Light and dark appearances survive fine in a playground. Both APIs read them, but they get there differently: SwiftUI’s
Color("name")follows thecolorSchemeenvironment value, whileUIColor(named:)resolves against aUITraitCollection- so forcing an appearance in UIKit means callingresolvedColor(with:)explicitly.import UIKit import SwiftUI import PlaygroundSupport let colorFromCatalog = UIColor(named: "SwiftBrandOrange") // works let colorFromCatalogAsColor = Color("SwiftBrandOrange") // works let colorFromCatalogResolvedLight = colorFromCatalog? .resolvedColor(with: UITraitCollection(userInterfaceStyle: .light)) let colorFromCatalogResolvedDark = colorFromCatalog? .resolvedColor(with: UITraitCollection(userInterfaceStyle: .dark)) let colorInCodeLight = Color(red: 0.94, green: 0.32, blue: 0.22) let colorInCodeDark = Color(red: 1.00, green: 0.54, blue: 0.40) /// A bordered color box. The outline matters: a color that fails to resolve renders as clear private func colorBox(_ color: Color?, size: CGFloat = 100) -> some View { RoundedRectangle(cornerRadius: 8) .fill(color ?? .clear) .frame(width: size, height: size) .overlay( RoundedRectangle(cornerRadius: 8) .stroke(.gray, lineWidth: 1) ) } private func colorBox(_ color: UIColor?, size: CGFloat = 100) -> some View { colorBox(color.map(Color.init), size: size) } struct ColorView: View { var body: some View { HStack(spacing: 20) { column( title: "Light", swiftUIColor: colorFromCatalogAsColor, uiKitColor: colorFromCatalogResolvedLight, colorInCode: colorInCodeLight, background: .white ) .environment(\.colorScheme, .light) Divider() column( title: "Dark", swiftUIColor: colorFromCatalogAsColor, uiKitColor: colorFromCatalogResolvedDark, colorInCode: colorInCodeDark, background: .black ) .environment(\.colorScheme, .dark) } .padding(10) .border(Color.gray, width: 2) .cornerRadius(5) } private func column( title: String, swiftUIColor: Color, uiKitColor: UIColor?, colorInCode: Color, background: Color ) -> some View { VStack(spacing: 20) { Text(title) .font(.callout) .bold() .underline() Text("Color(\"name\")").font(.headline) colorBox(swiftUIColor) Text("UIColor(named:) resolved").font(.headline) colorBox(uiKitColor) Text("Programmatic").font(.headline) colorBox(colorInCode) } .padding() .background(background) } } demo( "Resolving a colorset under both appearances", expecting: "SwiftBrandOrange to differ between the Light and Dark columns, while the programmatic swatch stays the same" ) { PlaygroundPage.current.setLiveView(ColorView()) }
Audio assets
- Audio has both paths: a loose
.mp3inResources/, or a Data Set in an Asset Catalog read throughNSDataAsset. - The extension is not optional here.
UIImage(named:)will find a loose.pngwithout one, butBundle.main.url(forResource:withExtension:)has no such fallback - passingnilreturnsnil. - You don’t need
needsIndefiniteExecutionas long as the page sets a live view, since that keeps the page alive on its own. Play a sound without a live view and you’ll need it, or the page finishes and tears down playback before you hear anything. - The
AVAudioPlayerhas to be retained. Create one inside a function and it deallocates the moment that function returns -play()succeeds and nothing comes out.import AVFoundation import SwiftUI import PlaygroundSupport let audioFromResources = Bundle.main.url(forResource: "Swift_sound", withExtension: "mp3") // works let audioFromResourcesNoExt = Bundle.main.url(forResource: "Swift_sound", withExtension: nil) // nil - extension is required let audioFromCatalog = NSDataAsset(name: "Swift_sound_asset_catalog")?.data // works let playerFromResources = audioFromResources.flatMap { try? AVAudioPlayer(contentsOf: $0) } let playerFromResourcesNoExt = audioFromResourcesNoExt.flatMap { try? AVAudioPlayer(contentsOf: $0) } let playerFromCatalog = audioFromCatalog.flatMap { try? AVAudioPlayer(data: $0) } struct AudioView: View { var body: some View { VStack(alignment: .leading, spacing: 20) { row("Resources/ with extension", player: playerFromResources) row("Resources/ without extension", player: playerFromResourcesNoExt) row("Asset Catalog (NSDataAsset)", player: playerFromCatalog) } .padding() .border(Color.gray, width: 2) .cornerRadius(5) } private func row(_ title: String, player: AVAudioPlayer?) -> some View { HStack(spacing: 12) { Text(player == nil ? "❌" : "✅") VStack(alignment: .leading) { Text(title).font(.headline) Text(player == nil ? "not found" : "loaded") .font(.caption) .foregroundStyle(.secondary) } Spacer() Button("Play") { player?.currentTime = 0 player?.play() } .disabled(player == nil) } .frame(width: 380) } } demo( "Loading audio from Resources/ and an Asset Catalog", expecting: "both the extension-qualified file and the data set to load; the bare name to fail" ) { PlaygroundPage.current.setLiveView(AudioView()) }
Video assets
- A loose
.mp4behaves exactly like audio:Bundle.main.url(forResource:withExtension:)with the extension spelled out, thenAVPlayer(url:). - The catalog path is where video diverges.
AVAudioPlayerhas aninit(data:);AVPlayerhas no data initializer at all. It takes a URL, andAVAssetis URL-backed too, so bytes from a Data Set have to be written to a temporary file first. - Worth noting how that failure differs from the rest: everywhere else a wrong approach returns
nilat runtime, but here it simply doesn’t compile - there’s noAVPlayer(data:)to call - so you find out immediately instead of staring at an empty view. import AVKitfails outright in a playground; it can’t resolve itsCoreAudioTypesdependency in the simulator runtime. That rules out SwiftUI’sVideoPlayerandAVPlayerViewController.AVFoundationloads fine, so the workaround is to build the video surface fromAVPlayerLayerinside aUIViewRepresentable- at the cost of the built-in playback controls.import AVFoundation import SwiftUI import PlaygroundSupport final class PlayerContainerView: UIView { override class var layerClass: AnyClass { AVPlayerLayer.self } var playerLayer: AVPlayerLayer { layer as! AVPlayerLayer } } struct PlayerLayerView: UIViewRepresentable { let player: AVPlayer func makeUIView(context: Context) -> PlayerContainerView { let view = PlayerContainerView() view.playerLayer.player = player view.playerLayer.videoGravity = .resizeAspect return view } func updateUIView(_ uiView: PlayerContainerView, context: Context) {} } let videoFromResources = Bundle.main.url(forResource: "Swift_video", withExtension: "mp4") // works let videoDataFromCatalog = NSDataAsset(name: "Swift_video_asset_catalog")?.data // works - but it's Data, not a URL let videoFromCatalogTempURL: URL? = { guard let videoDataFromCatalog else { return nil } let url = FileManager.default .temporaryDirectory .appendingPathComponent("Swift_video_from_catalog.mp4") do { try videoDataFromCatalog.write(to: url) return url } catch { return nil } }() let playerFromResources = videoFromResources.map(AVPlayer.init(url:)) let playerFromCatalog = videoFromCatalogTempURL.map(AVPlayer.init(url:)) struct VideoView: View { var body: some View { VStack(alignment: .leading, spacing: 20) { row("Resources/ - AVPlayer(url:)", player: playerFromResources) row("Asset Catalog - NSDataAsset via temp file", player: playerFromCatalog) } .padding() .border(Color.gray, width: 2) .cornerRadius(5) } private func row(_ title: String, player: AVPlayer?) -> some View { VStack(alignment: .leading, spacing: 8) { HStack(spacing: 8) { Text(player == nil ? "❌" : "✅") Text(title).font(.headline) } if let player { PlayerLayerView(player: player) .frame(width: 320, height: 180) .cornerRadius(8) Button("Play") { player.seek(to: .zero) player.play() } } else { RoundedRectangle(cornerRadius: 8) .fill(.gray.opacity(0.2)) .frame(width: 320, height: 180) .overlay( Text("not available").foregroundStyle(.secondary) ) } } } } demo( "Loading video from Resources/ and an Asset Catalog", expecting: "both to play - the catalog one only after its bytes are written to a temp file" ) { PlaygroundPage.current.setLiveView(VideoView()) }
Running unit tests
A
.playgroundhas no test target or scheme, so there’s noProduct > Test(⌘U) command and no green checkmarks in the gutter -XCTestCasestill imports and compiles fine, but nothing triggers it automatically.Calling
PersonTests.defaultTestSuite.run()manually is what makes it work: it synchronously runs everytest*method on the class and reports pass/fail throughXCTAssertcalls, same as a normal test target would.The output only shows up as console logging in the debug area (
View > Debug Area > Activate Console) - unlike the other pages, there’s nosetLiveViewhere, since a test run isn’t aViewto render.To run just one test instead of the whole suite, construct the case directly with
init(selector:)and call.run()on that single instance - see the commented-out lines belowPersonTests.defaultTestSuite.run().import XCTest struct Person { let name: String var occupation: String? init(name: String, occupation: String? = nil) { self.name = name self.occupation = occupation } } class PersonTests: XCTestCase { func testPersonInitializedWithGivenParams() { let name = "John AppleSeed" let occupation = "Designer" let sut = Person(name: name, occupation: occupation) XCTAssertEqual(sut.name, name) XCTAssertEqual(sut.occupation, occupation) } func testPersonInitializedWithOnlyName() { let name = "Steve" let sut = Person(name: name) XCTAssertEqual(sut.name, name) XCTAssertNil(sut.occupation) } } demo( "Running a single test in isolation", expecting: "only testPersonInitializedWithOnlyName to run, and to pass" ) { PersonTests(selector: #selector(PersonTests.testPersonInitializedWithOnlyName)).run() } demo( "Running the whole test suite", expecting: "both Person tests to run, and to pass" ) { PersonTests.defaultTestSuite.run() }
Adding pages
- A new playground starts with a single page. Each page gets its own live view.
- A playground can contain multiple pages.
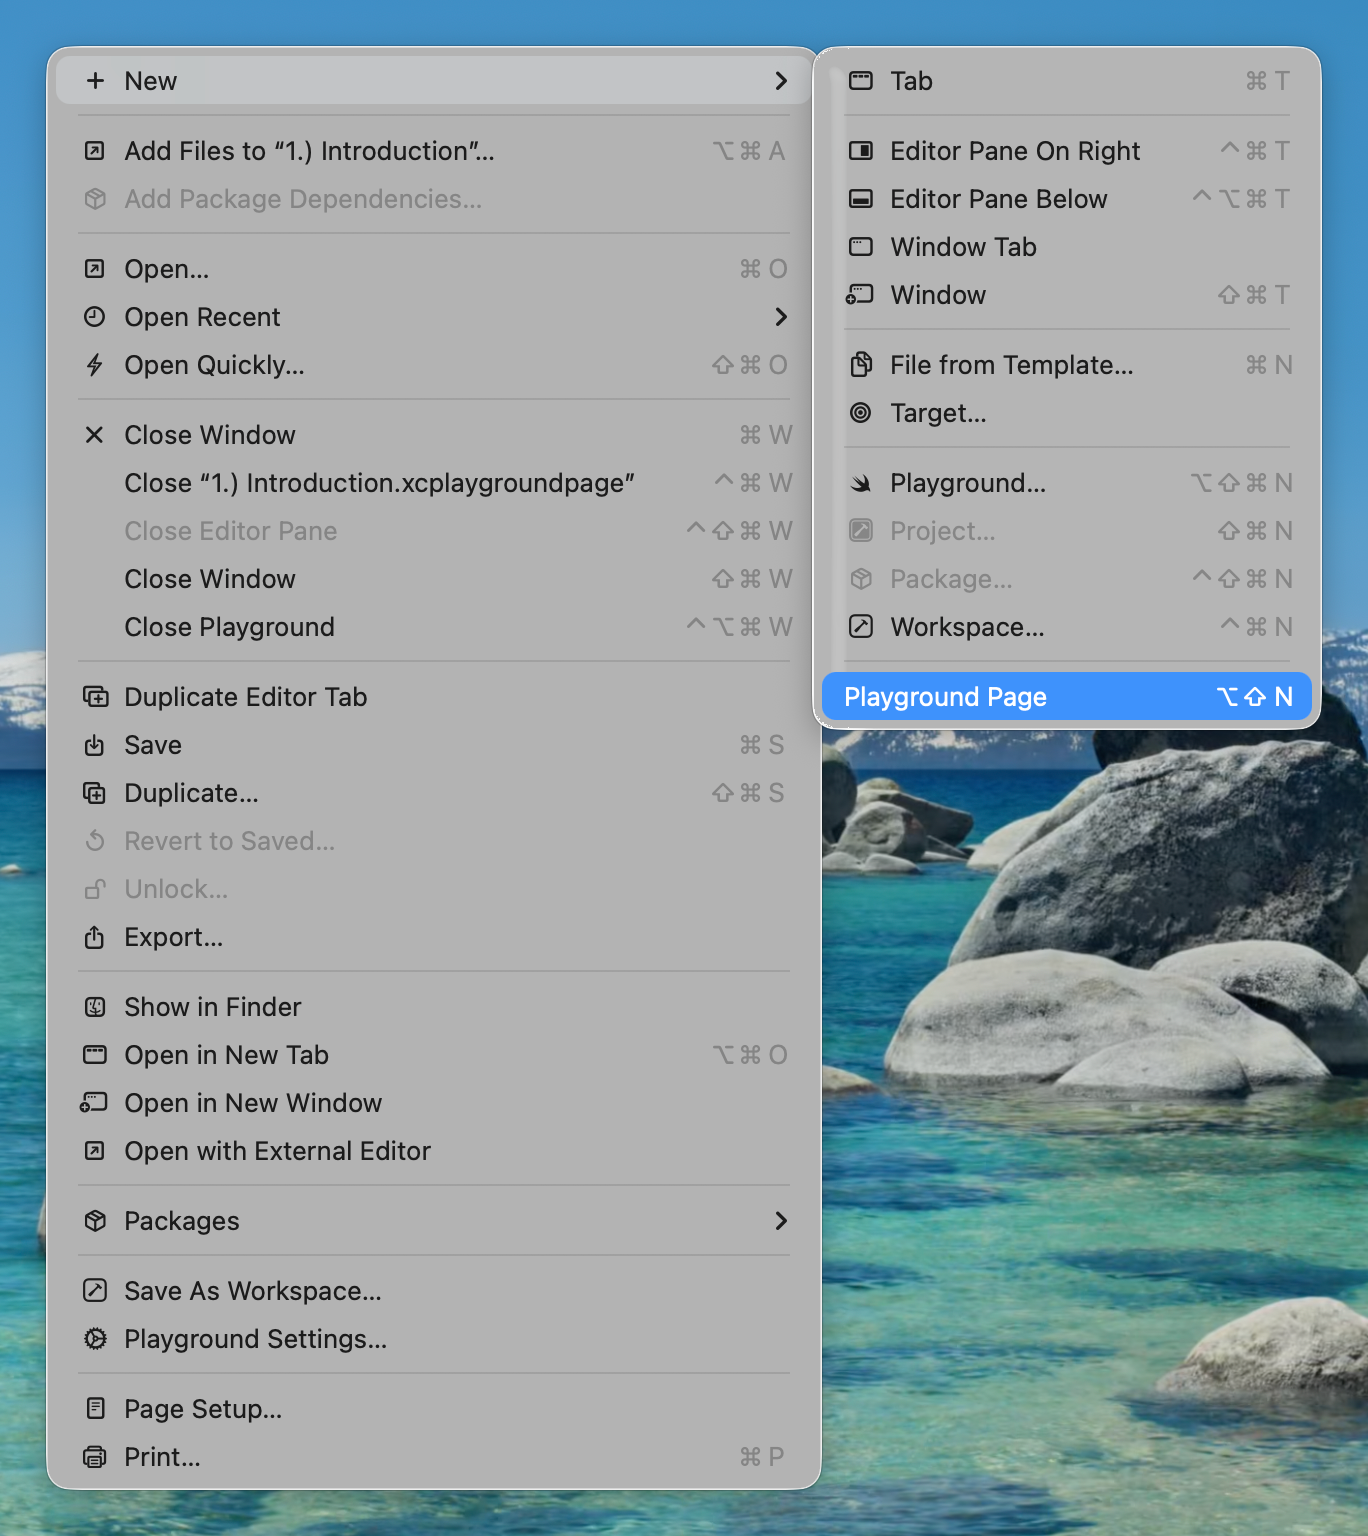
To add one, open the playground and go to “File → New → Playground Page” or ⌥⇧N (i.e. OPT + SHIFT + N).
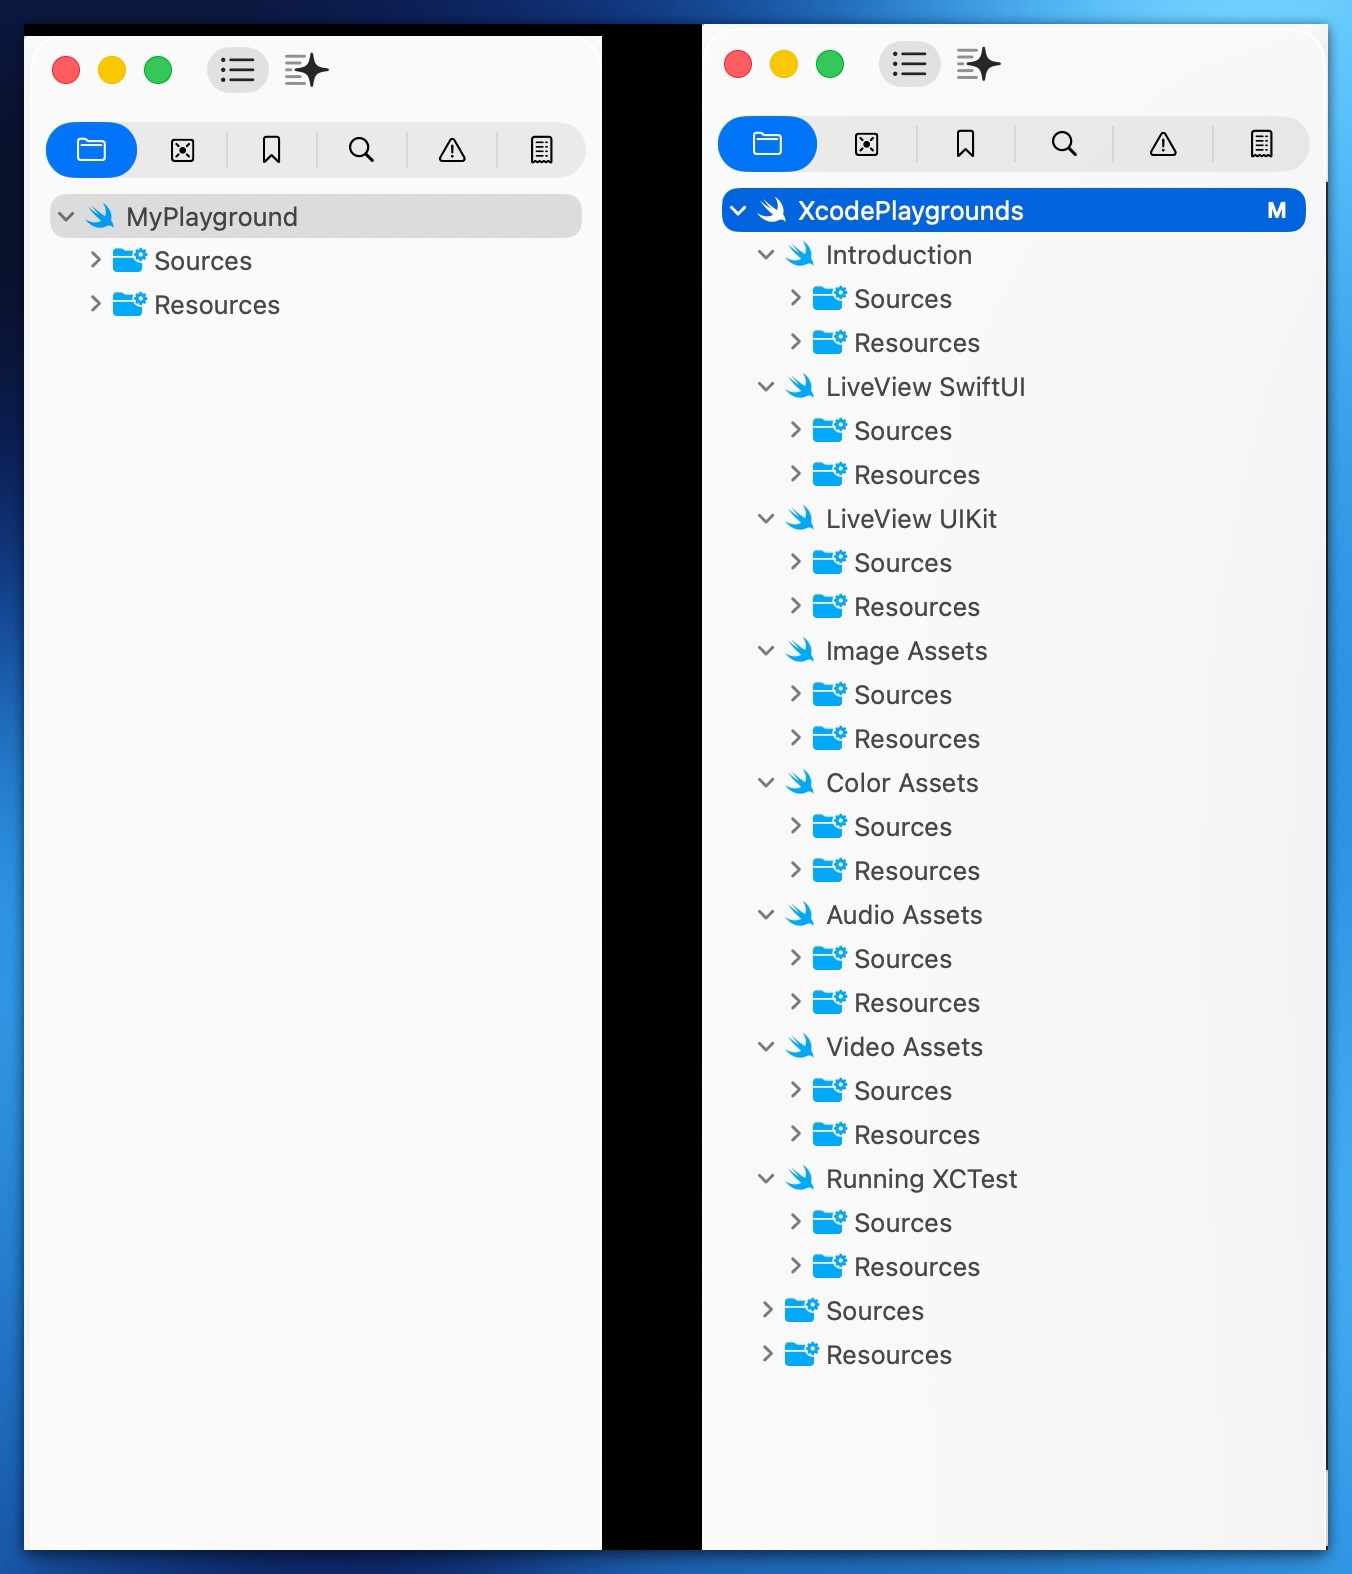
When there are multiple pages, the Playground project and the Pages will be displayed separately.
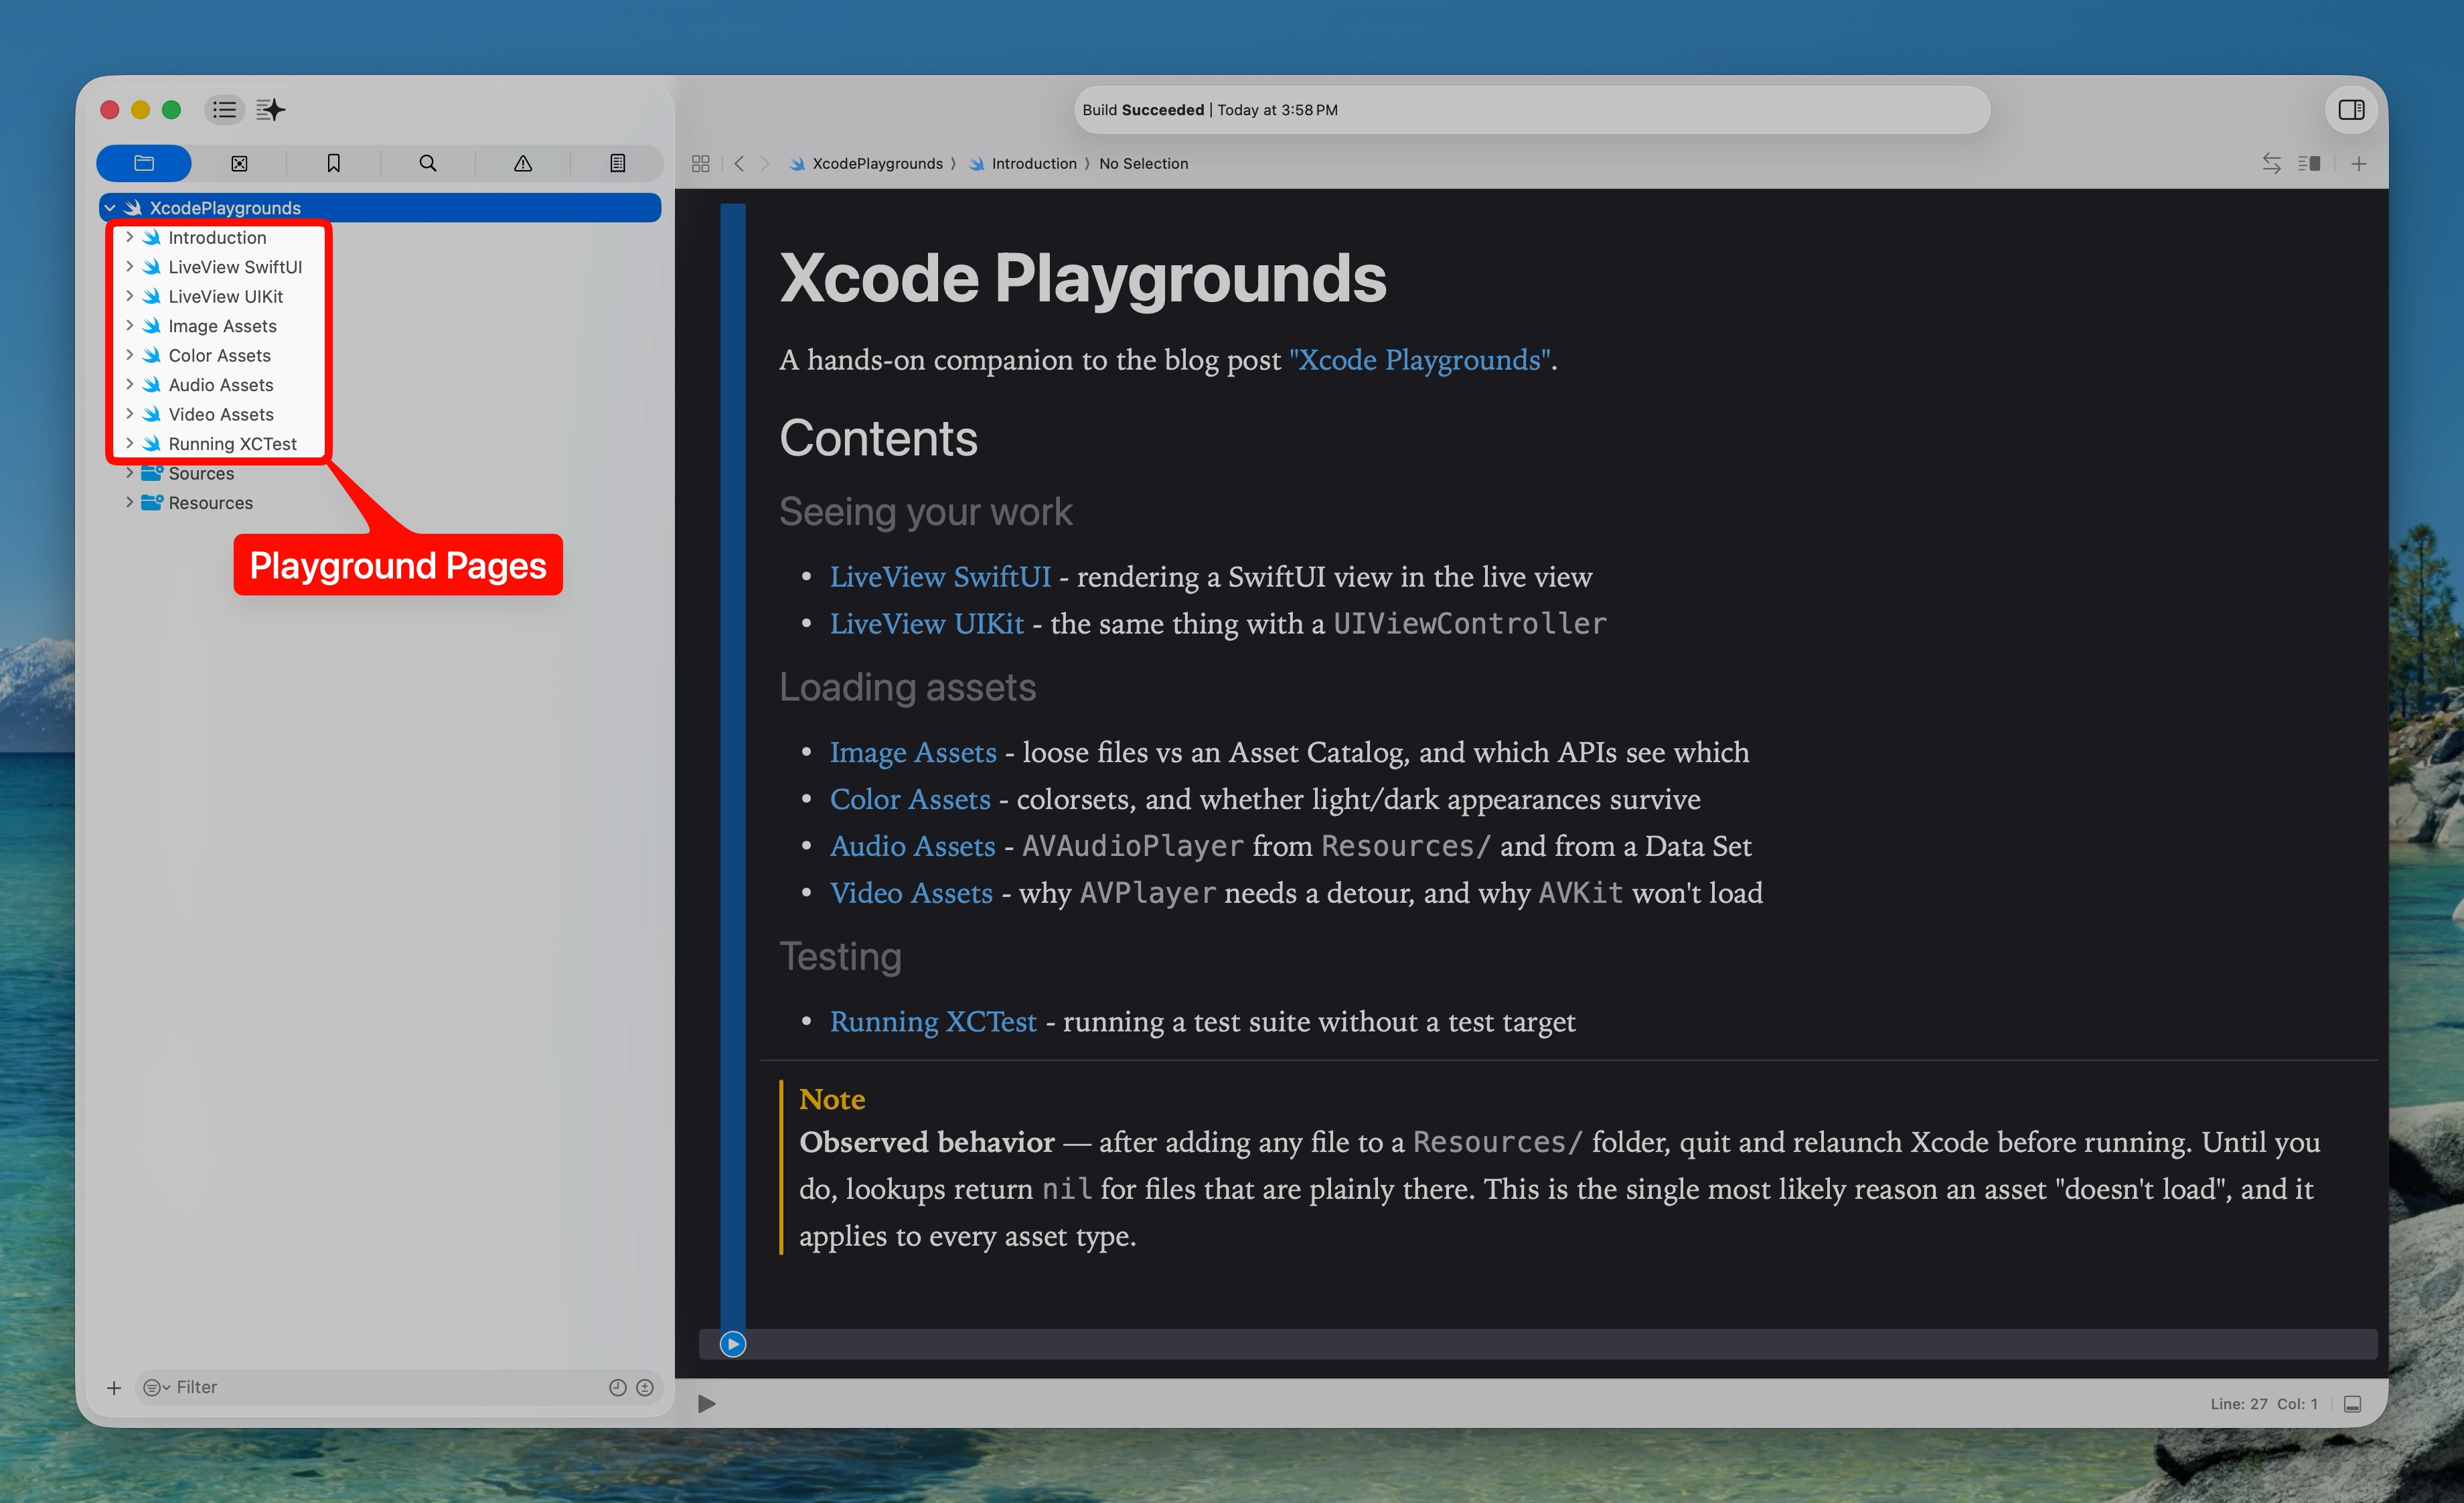
To rename a Page, select its name in the navigator and press Enter.
Each Page is an independent module - code in Page A can’t be called from Page B.
Navigating between pages
In a multi-page playground you navigate between pages using markup links in each page’s code.
The following code enables previous and next page navigation in the order of navigation bar on the left.
//: [Previous](@previous)

import Foundation

var greeting = "Hello, playground"

//: [Next](@next)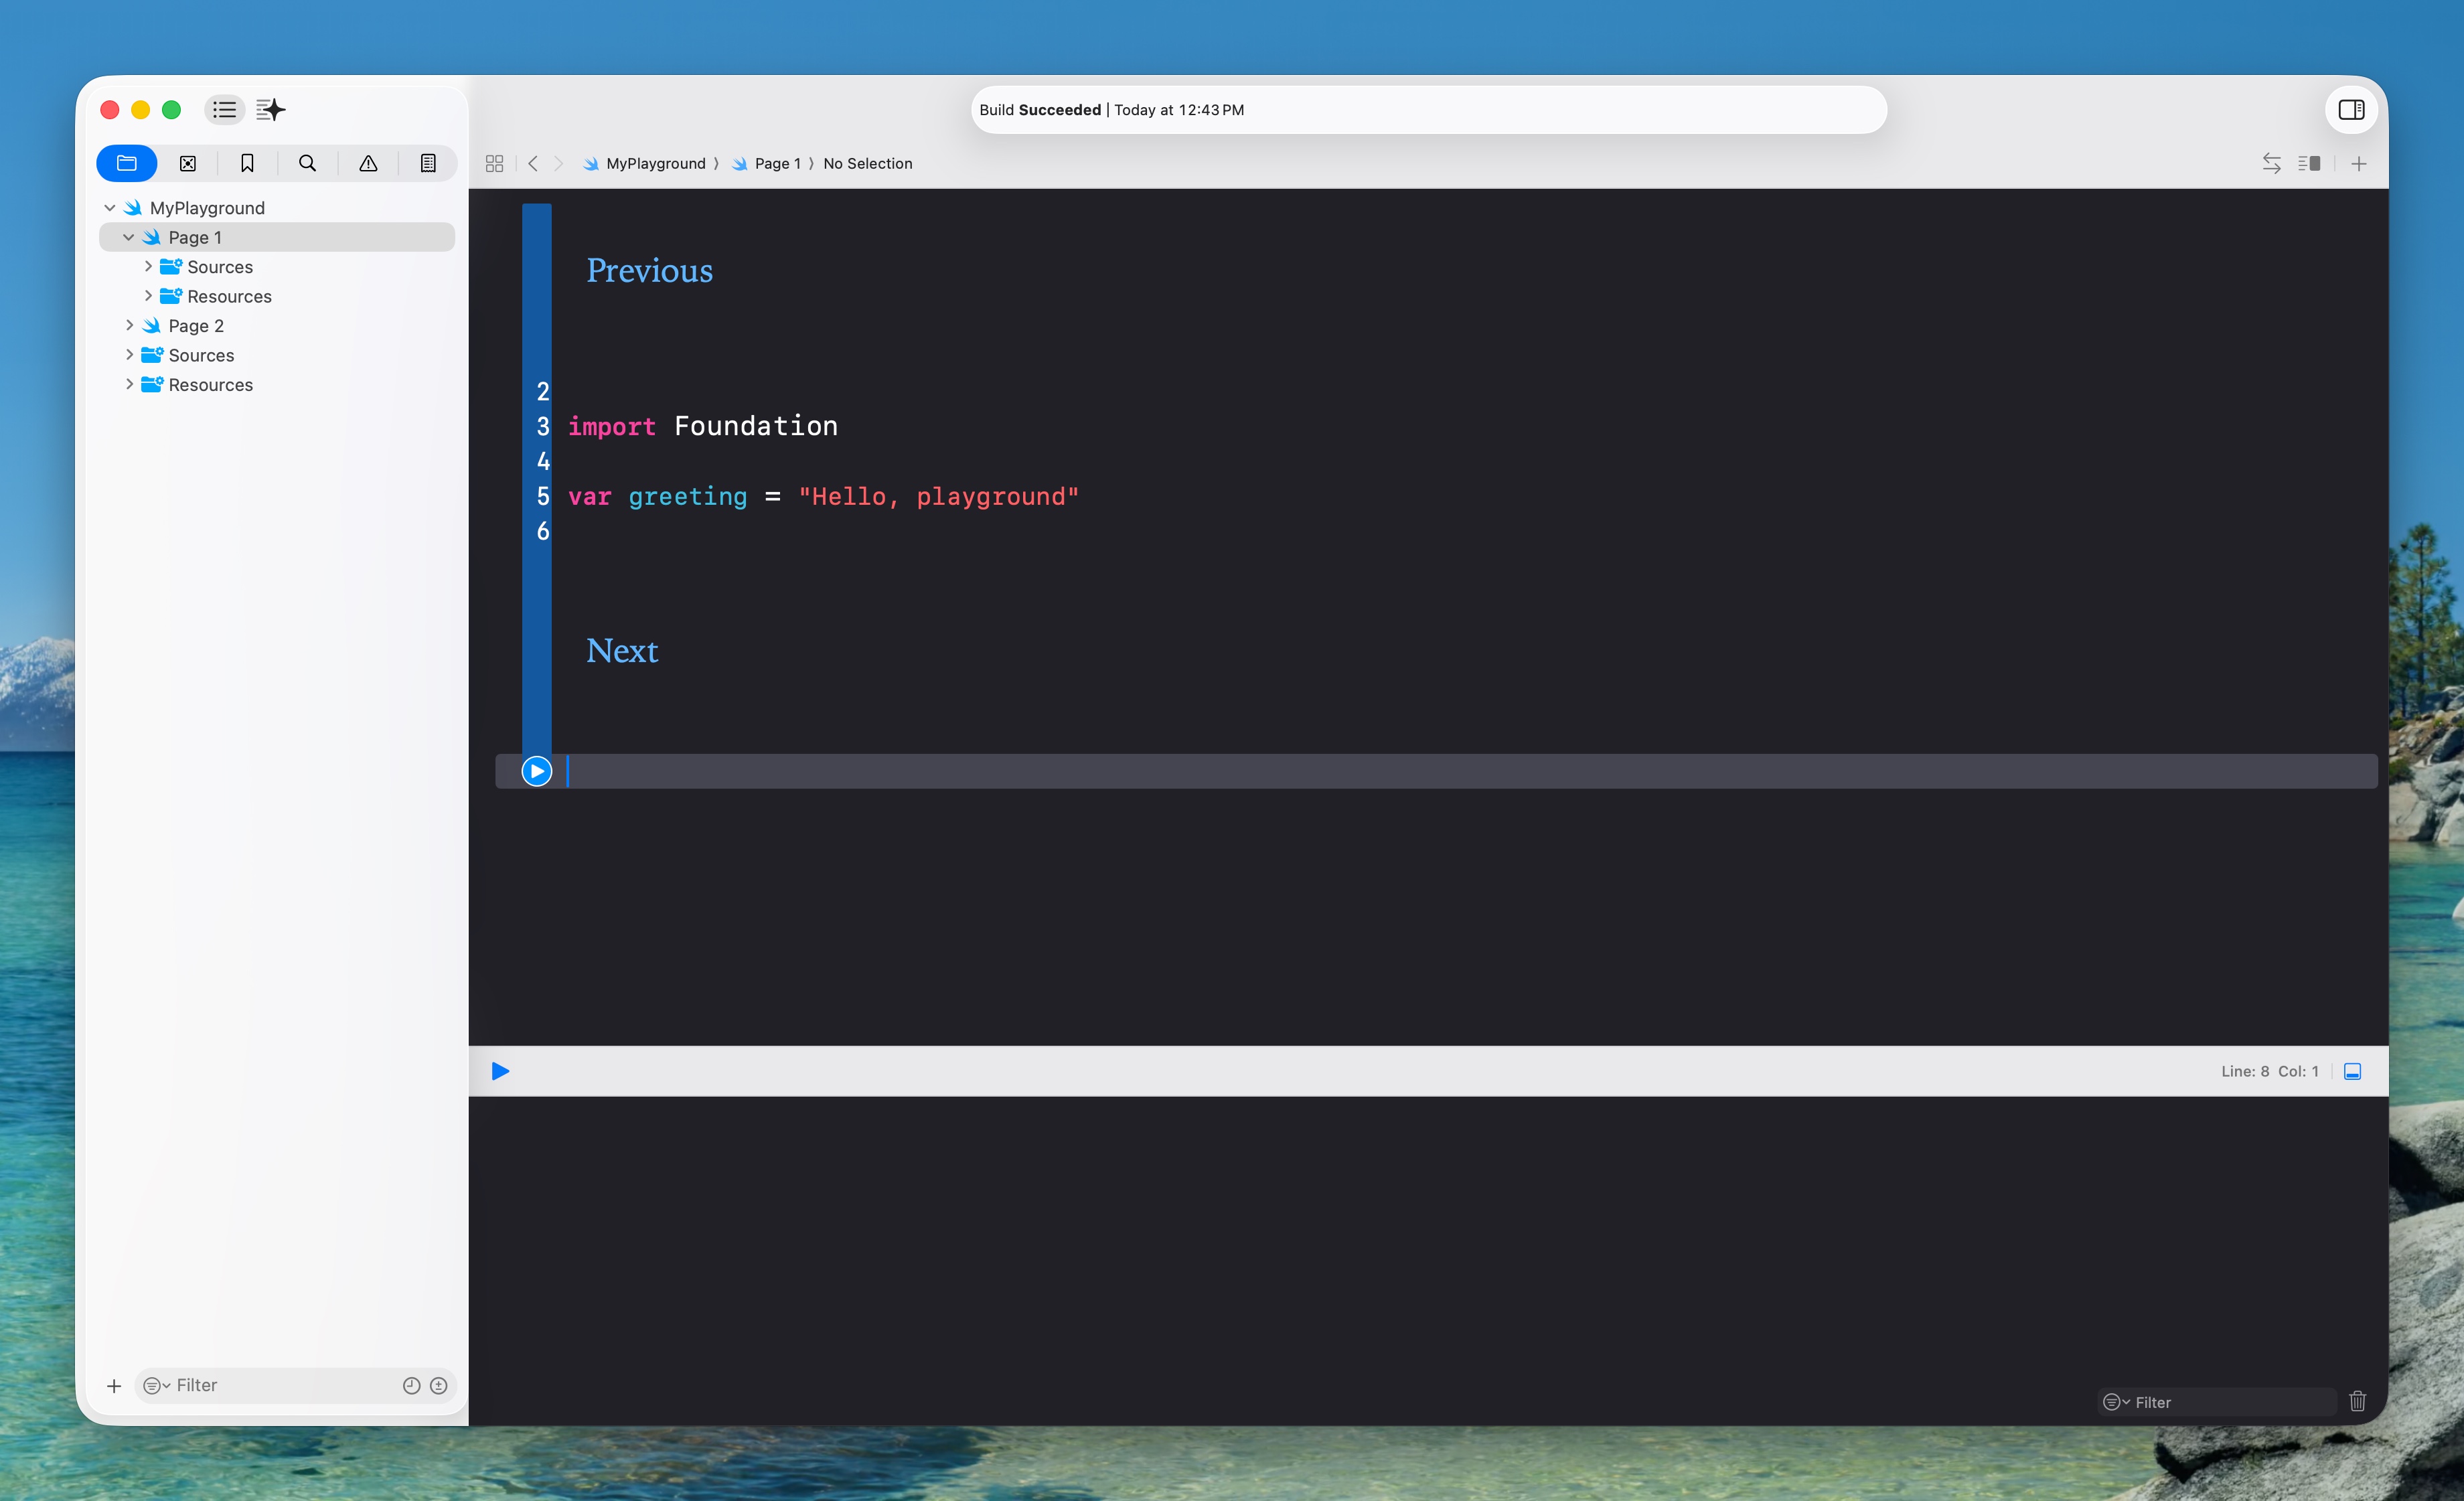
Going Further
Project folder structure
Here’s what a playground looks like on disk:
MyPlayground.playground/ ├── Contents.swift ← main code (single-page mode) ├── contents.xcplayground ← metadata: target platform, version ├── Resources/ ← loose assets (Asset Catalog, ML Model, images, JSON, sounds) ├── Sources/ ← helper code, compiled once as its own module └── Pages/ ← multi-page mode ├── PageOne.xcplaygroundpage/ │ ├── Contents.swift │ ├── Resources/ ← page-scoped assets │ └── Sources/ ← page-scoped helper code └── PageTwo.xcplaygroundpage/ └── ...Contents.swiftruns interpreted, top-to-bottom, re-executing live as you type - instant feedback, but slow for anything non-trivial.Resources/holds loose asset files, and can also hold an Asset Catalog (.xcassets) dragged in manually - bothUIImage(named:)andImage("name")resolve from a catalog, while loose files only work withUIImage(named:).Sources/holds helper Swift code compiled once into its own module (not re-interpreted per keystroke) - anything used fromContents.swiftmust be markedpublic, since it’s a separate module.Pages/(multi-page playgrounds) - each page is independent (own execution context, no shared runtime state between pages), and bothResources/andSources/exist at two scopes: shared at the project root, or scoped to just one page.
In a single-page playground there is only one set of Sources and Resources directories, in a multi-page one there are Sources and Resources directories under each Page in addition to the project root directory.
Sharing code with the Sources/ folder
Contents.swiftis interpreted and re-runs as you type, which is what makes a playground feel live - but it also means anything non-trivial sitting there gets re-executed on every keystroke.Sources/is the escape hatch: it’s compiled once into its own module and imported automatically, so helper code stays fast and out of the way.Two consequences follow from it being a separate module:
- Anything you want to call from a page has to be marked
public. Swift’s defaultinternalaccess stops at the module boundary, so an unmarked function simply won’t exist as far asContents.swiftis concerned. - Code in
Sources/can’t see anything declared inContents.swift. The dependency only points one way.
- Anything you want to call from a page has to be marked
In this playground I used it for two helpers shared by every page. The first,
demo(_:expecting:run:), wraps each example so the console output reads as labeled sections instead of a wall of undifferentiated logging:import Foundation /// Prints a labeled header stating the capture style under test and the /// expected outcome, then runs the suite - so each page's console output /// reads as a titled comparison instead of raw XCTest noise. /// /// - Parameters: /// - captureStyle: The self-capture style being demonstrated (e.g. "weak self"). /// - outcome: The expected result of running the suite (e.g. "sut deallocates cleanly"). /// - run: A closure that runs the suite of tests for the capture style being demonstrated. public func demo( _ captureStyle: String, expecting outcome: String, run: () -> Void ) { print(""" ═══════════════════════════════════════ 🔍 \(captureStyle) ⏳ Expecting: \(outcome) ═══════════════════════════════════════ """) run() }Which turns every page’s output into something you can scan:
═══════════════════════════════════════
🔍 Loading audio from Resources/ and an Asset Catalog
⏳ Expecting: both the extension-qualified file and the data set to load; the bare name to fail
═══════════════════════════════════════
Writing the expectation down is the part that earns its keep. It costs one line, and it turns “here’s some output” into a claim that can visibly fail - which is how you notice a result you didn’t intend.
The second helper,
preview(_:), renders an image at a fixed size for the live view, with an overload that degrades to blank space rather than crashing when the image isnil:import UIKit import SwiftUI public func preview(_ image: Image, size: CGFloat = 120) -> AnyView { AnyView( image .resizable() .scaledToFit() .frame(width: size, height: size) ) } public func preview(_ image: UIImage?, size: CGFloat = 120) -> AnyView { if let image { return preview(Image(uiImage: image), size: size) } else { return AnyView(Color.clear.frame(width: size, height: size)) } }That optional overload matters more than it looks: several pages exist specifically to show a lookup failing, and a helper that force-unwrapped would take the whole page down instead of rendering the empty box that is the finding.
Note:
Sources/exists at two scopes, exactly likeResources/. Helpers used by one page belong in that page’s ownSources/; anything shared belongs at the project root.demoandpreviewlive at the root, which is why every page can call them without importing anything.
Controlling page order
- **Pages sort alphabetically by filename, but that's only the default.** It's ASCII order, so uppercase sorts before lowercase: `Self Type` lands above `self`. That's why you'll see playgrounds with pages called `1.) Introduction` - a prefix is the usual hack to force something to the top.
- You don't need the hack. Add an explicit `<pages>` element to `contents.xcplayground` and the order is whatever you list:
<?xml version="1.0" encoding="UTF-8" standalone="yes"?>
<playground version='7.0' target-platform='ios' swift-version='6' display-mode='raw' buildActiveScheme='true' importAppTypes='true'>
<pages>
<page name='Introduction'/>
<page name='LiveView SwiftUI'/>
<page name='LiveView UIKit'/>
<page name='Image Assets'/>
<page name='Color Assets'/>
<page name='Audio Assets'/>
<page name='Video Assets'/>
<page name='Running XCTest'/>
</pages>
</playground>
- [Try it live](https://github.com/gopal-iosdev/UnOwnedSelf_Projects/tree/main/xcode-playgrounds/XcodePlaygrounds.playground/contents.xcplayground)
- Quit and relaunch Xcode after editing it. The names must match the page folder names exactly, minus the `.xcplaygroundpage` extension - and any page you leave out won't appear at all.Customizing what the results pane shows
By default, a playground decides how to display your type in the results pane on its own. Left alone, it does one of two things:
- If the type conforms to
CustomStringConvertible, it shows the result ofdescription. - If it doesn’t, it builds a structured dump from the type’s stored properties - accurate, but rarely what you want to look at.
- If the type conforms to
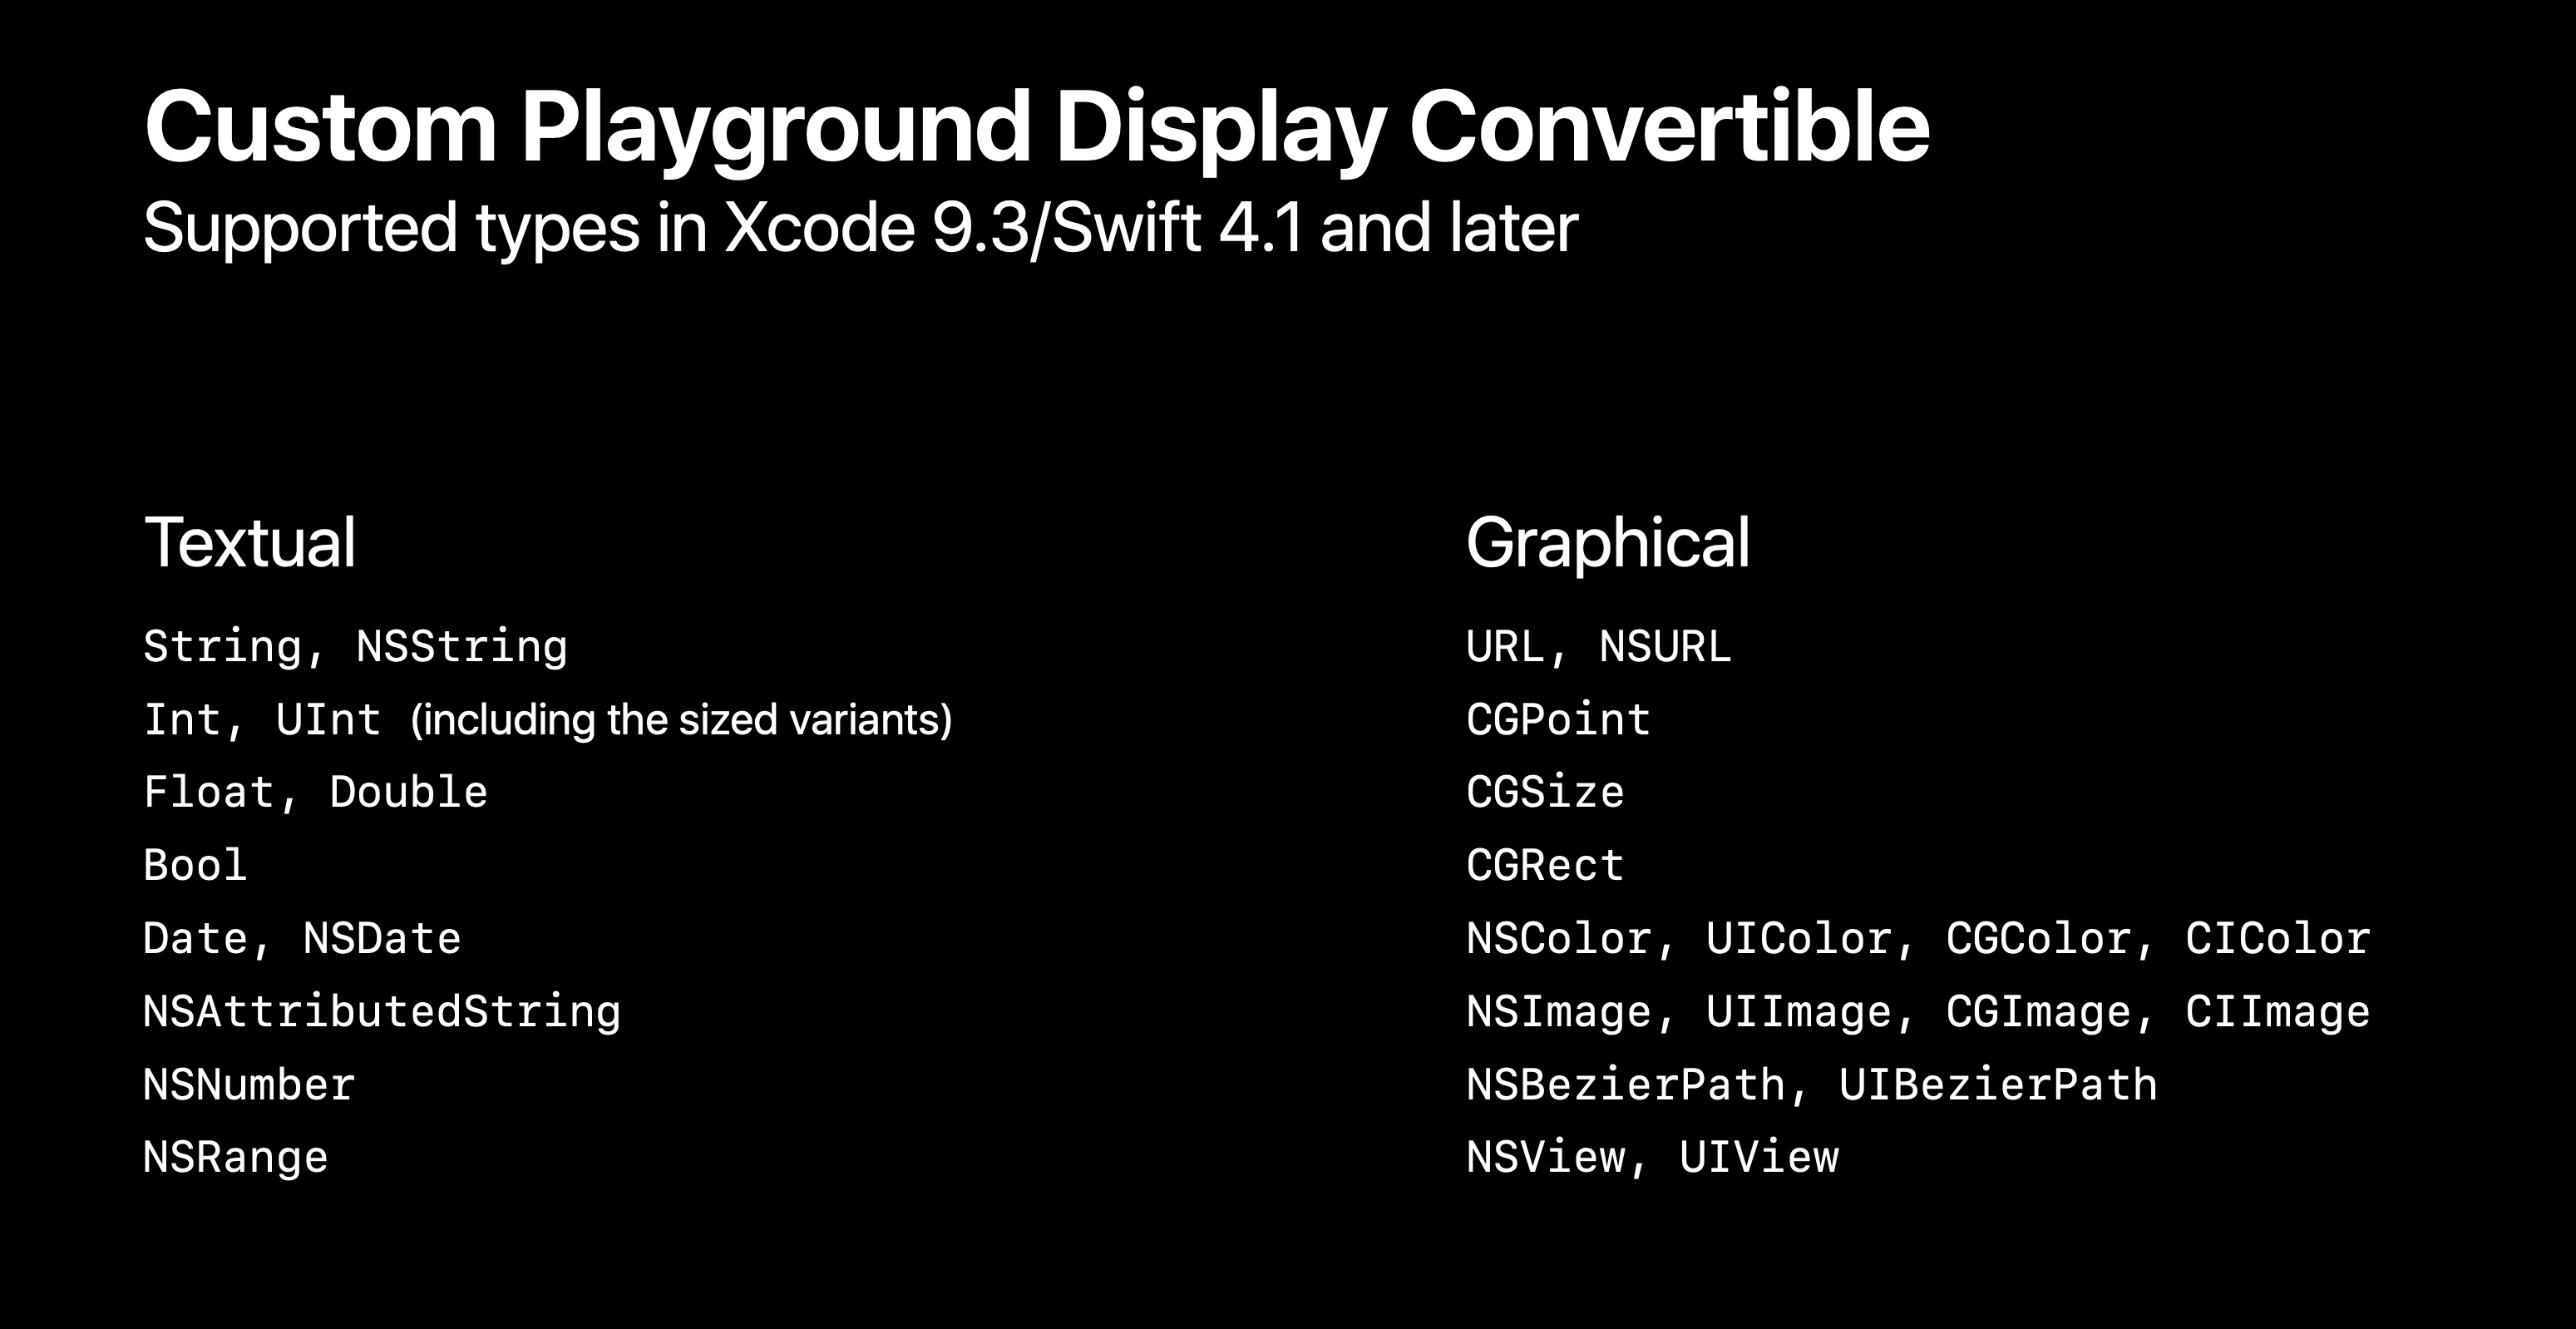
To take over, conform to CustomPlaygroundDisplayConvertible. It has a single requirement, playgroundDescription, which returns
Any- so you can hand back aString, an image, or anything else the playground already knows how to render.Apple already provides specialized representations for a number of types, as of Xcode 9.3 / Swift 4.1:
Writing markup documentation
- Markup is how you get formatted text into a playground - headings, links, images, the lot.
- A markup comment (i.e.
//:) is just a regular comment with a colon added at the end.
Formatting and rendering
Creating markdown in playground is like adding a comment to your code, you can learn more about markup here at daringfireball.net
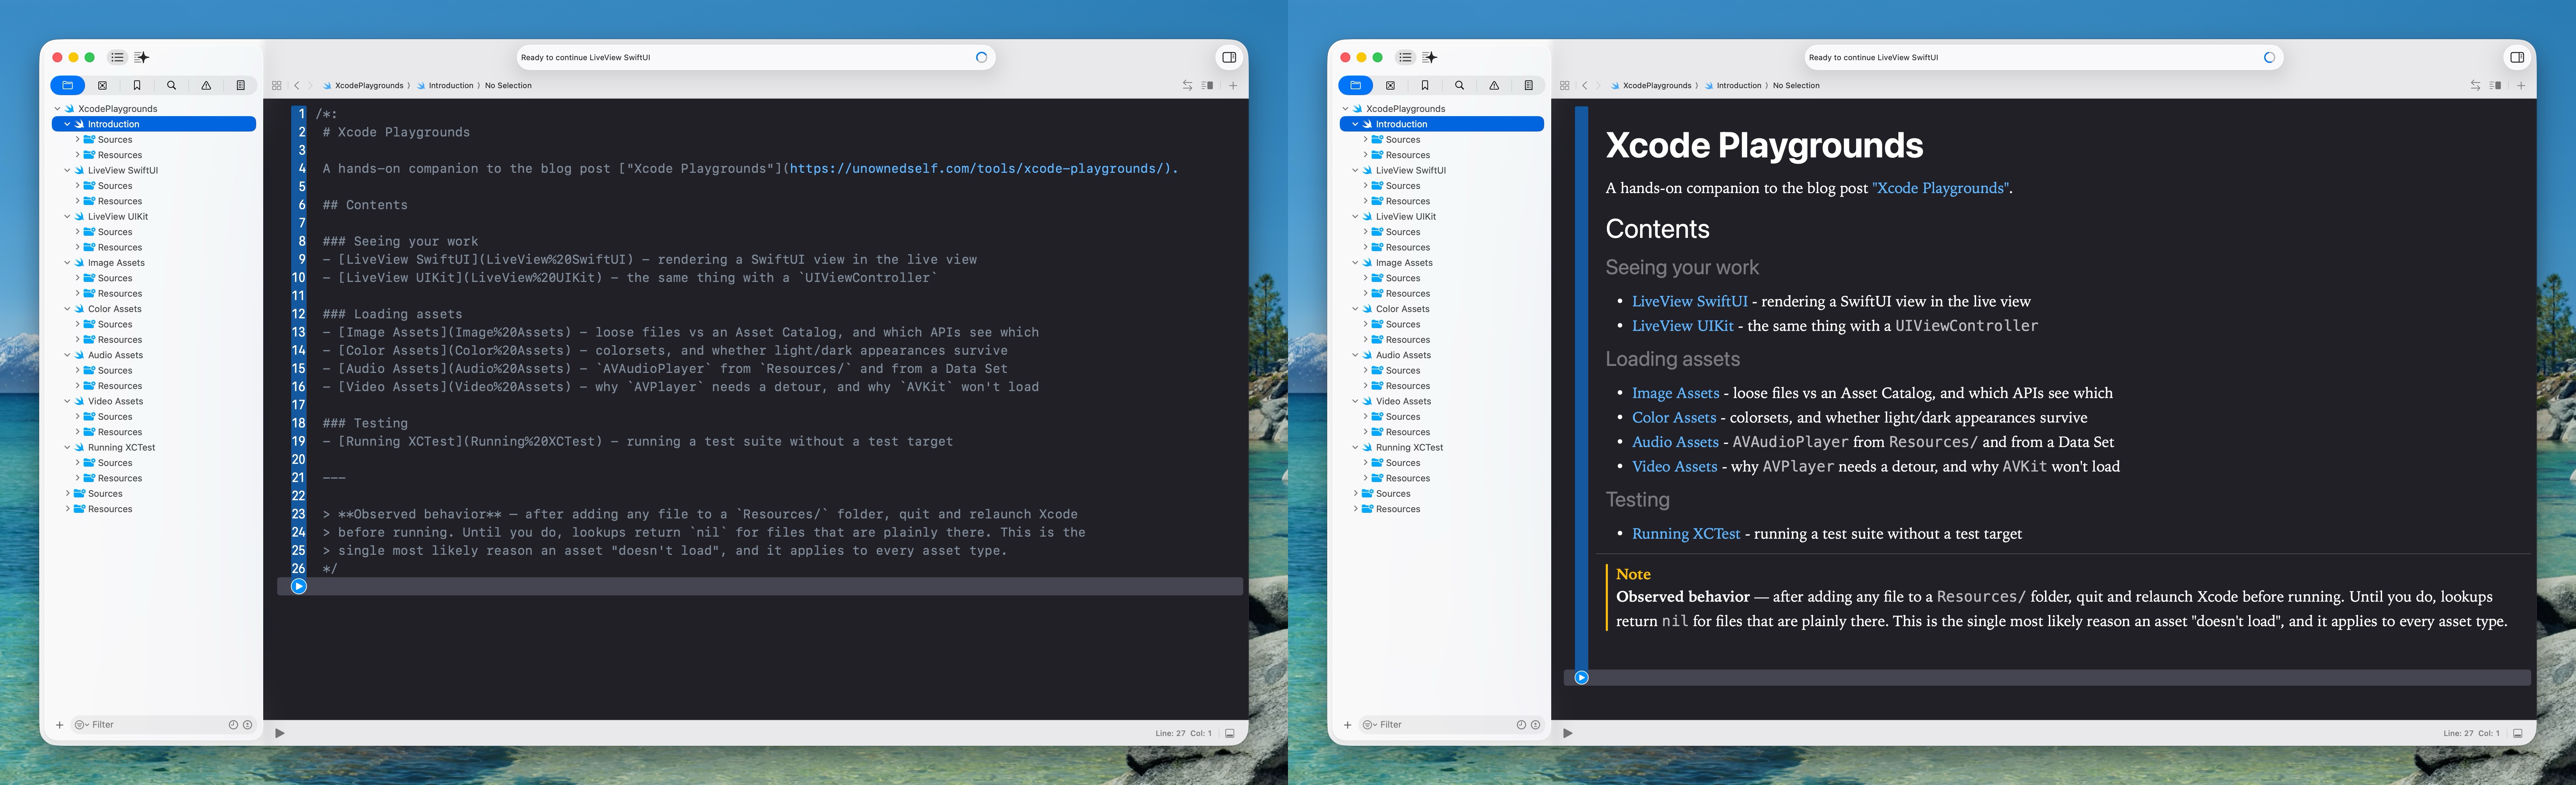
/*: # Xcode Playgrounds A hands-on companion to the blog post ["Getting Real Work Out of Xcode Playgrounds"](https://unownedself.com/tools/xcode-playgrounds/). ## Contents ### Seeing your work - [LiveView SwiftUI](LiveView%20SwiftUI) - rendering a SwiftUI view in the live view - [LiveView UIKit](LiveView%20UIKit) - the same thing with a `UIViewController` ### Loading assets - [Image Assets](Image%20Assets) - loose files vs an Asset Catalog, and which APIs see which - [Color Assets](Color%20Assets) - colorsets, and whether light/dark appearances survive - [Audio Assets](Audio%20Assets) - `AVAudioPlayer` from `Resources/` and from a Data Set - [Video Assets](Video%20Assets) - why `AVPlayer` needs a detour, and why `AVKit` won't load ### Testing - [Running XCTest](Running%20XCTest) - running a test suite without a test target --- > **Observed behavior** — after adding any file to a `Resources/` folder, quit and relaunch Xcode > before running. Until you do, lookups return `nil` for files that are plainly there. This is the > single most likely reason an asset "doesn't load", and it applies to every asset type. */To preview markup:
Select
Render Documentationunder the “Playground Settings” of File Inspector in the right Inspector window: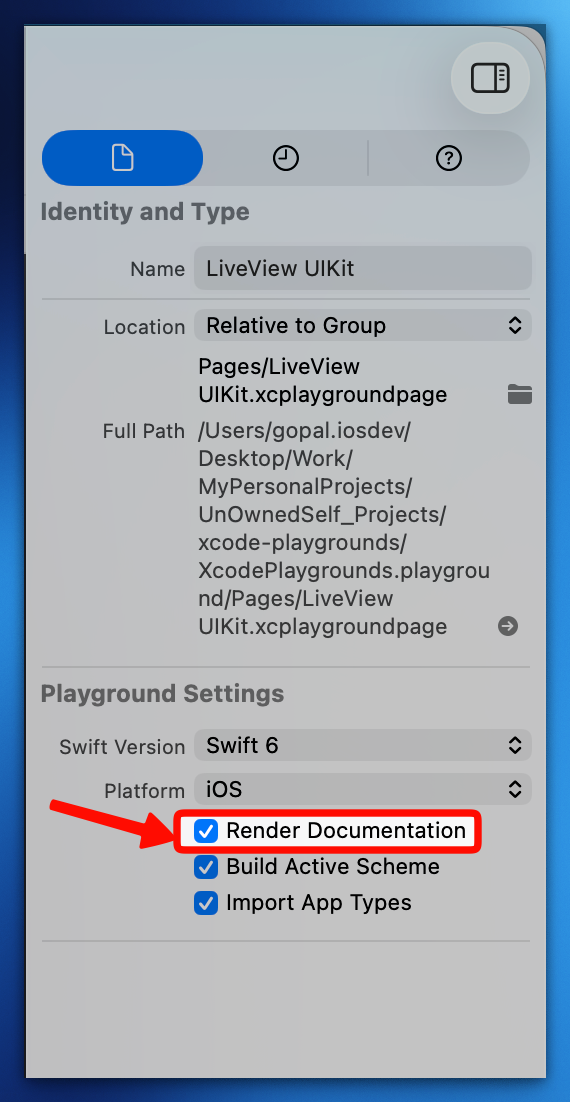
Open playground and “Editor → Show Rendered Markup”
- Toggle back anytime with “Editor → Show Raw Markup”
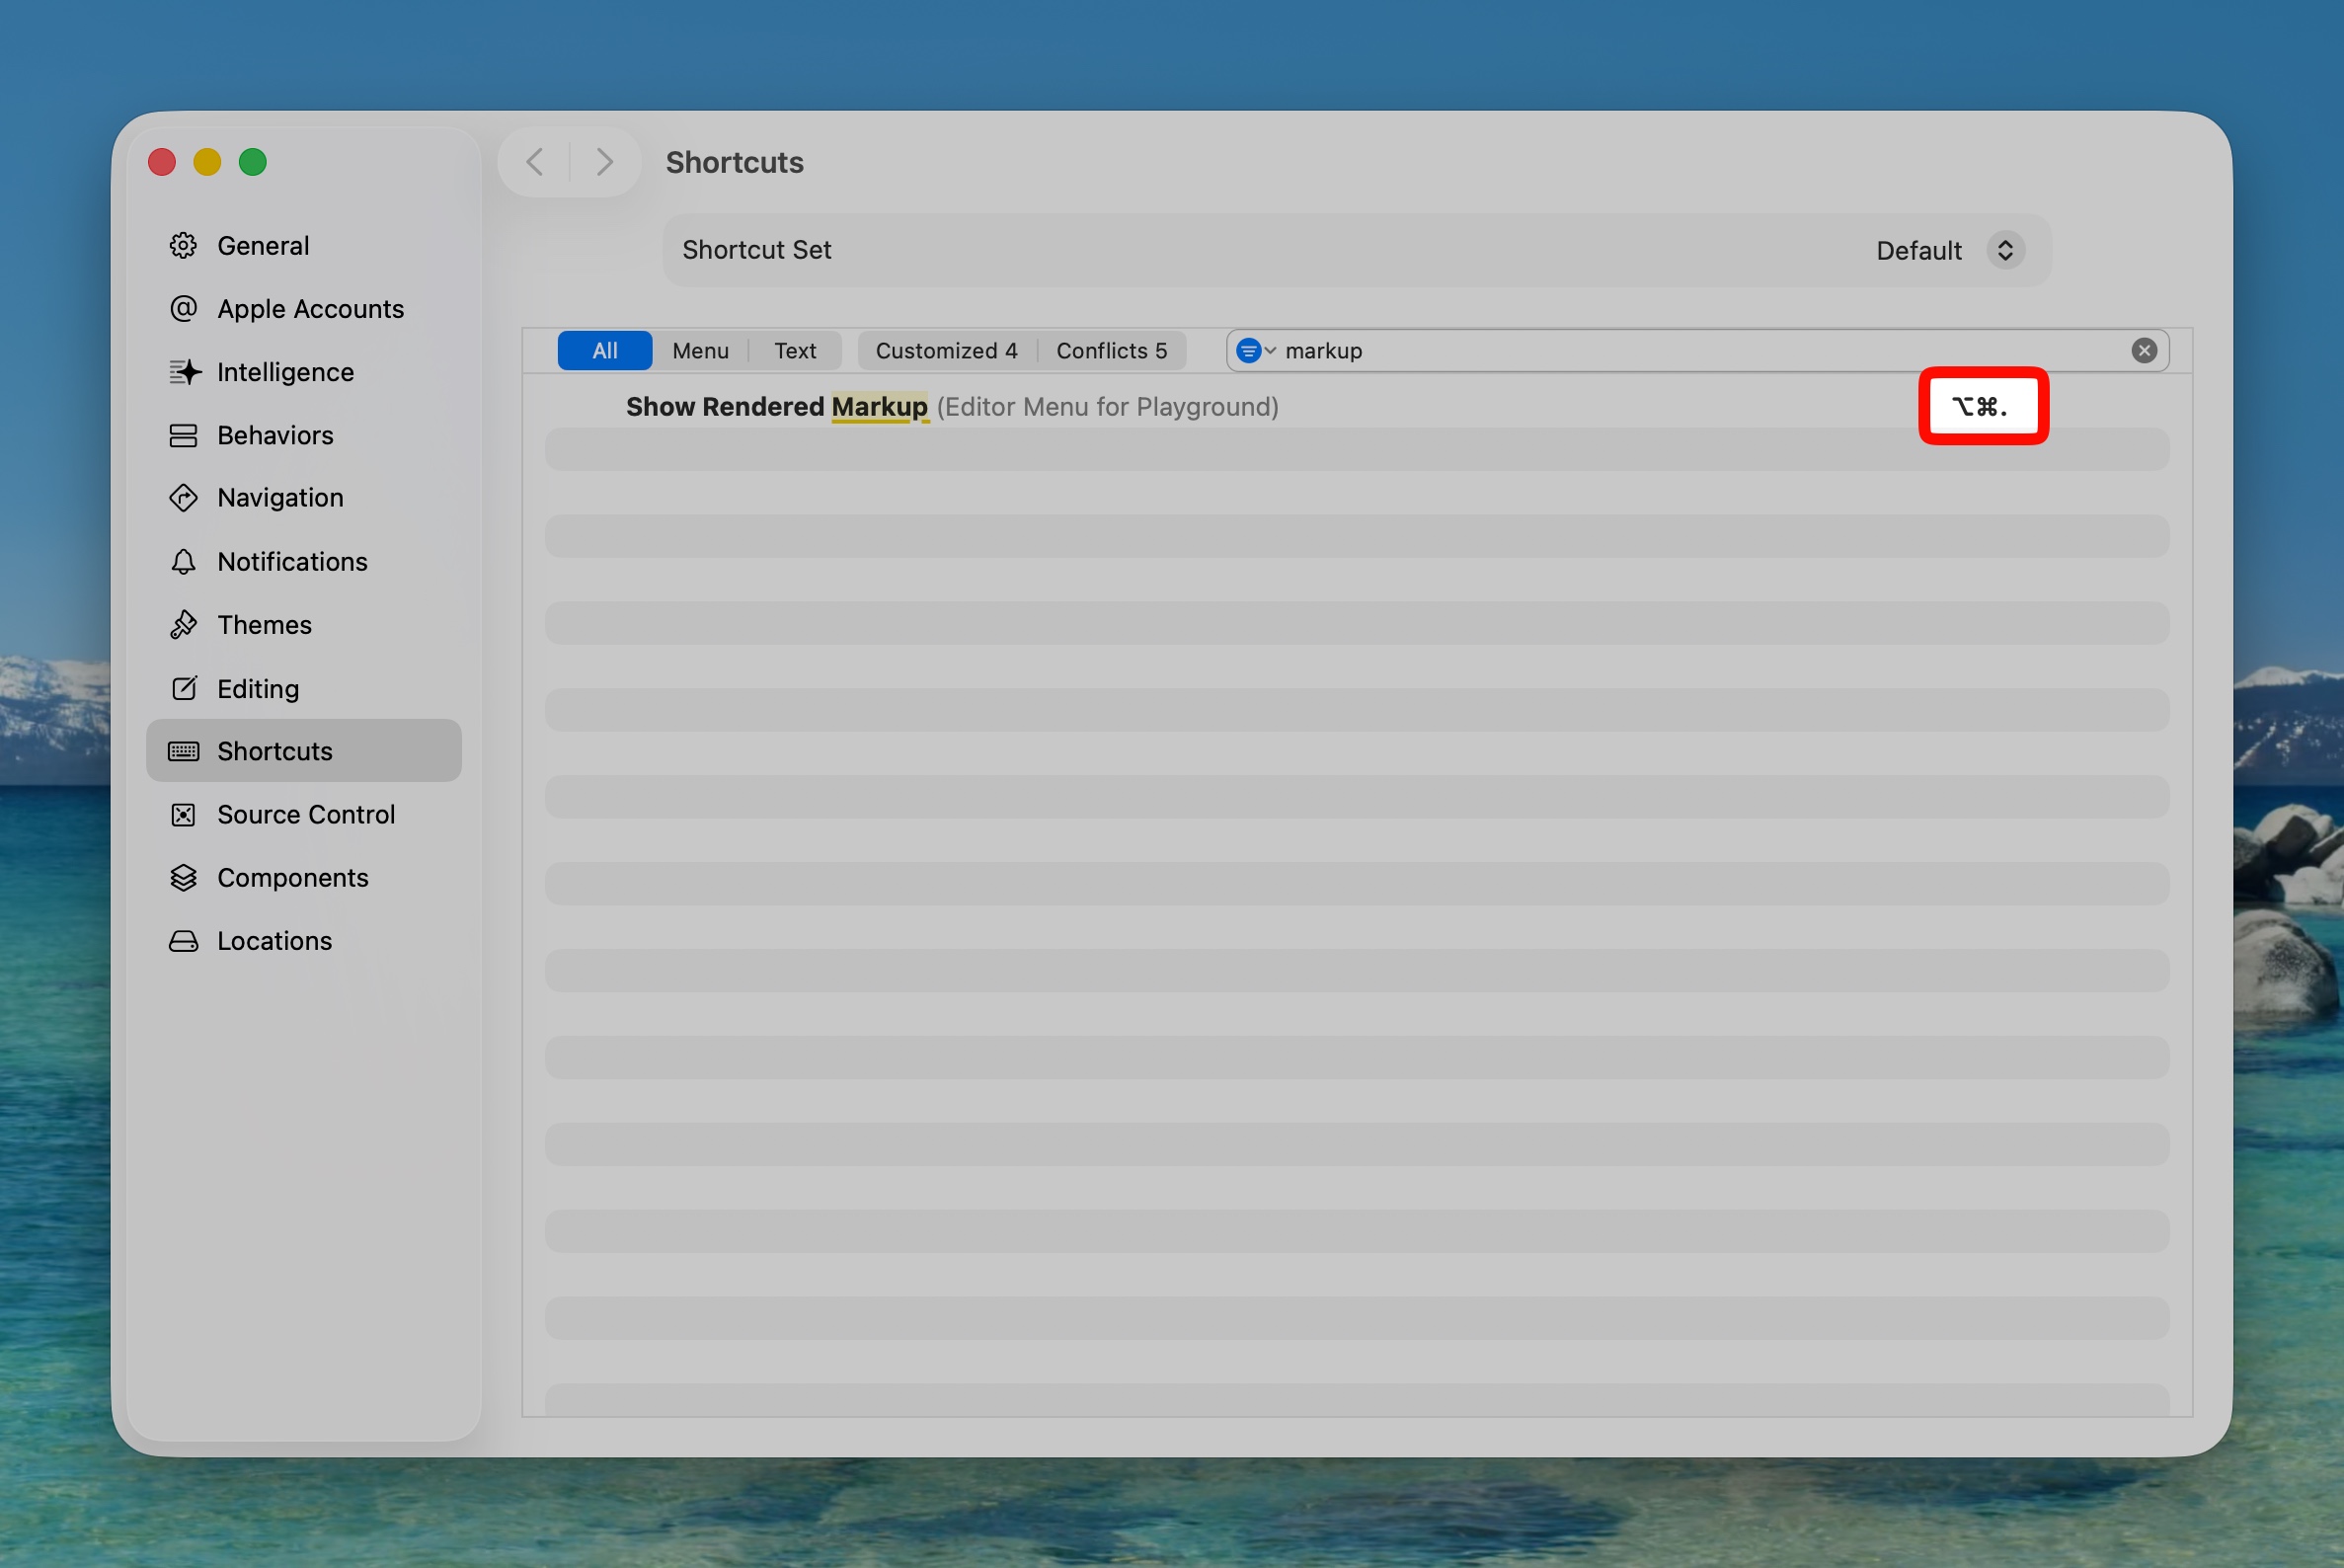
- You would be doing this a lot, and you can create a key binding by going to Xcode preferences (i.e. ⌘, => CMD + ,) for it as shown below. I use ⌘⇧. (i.e. CMD + SHIFT + .) as mine.
Here is how Rendered state will look like:
A reusable page template
In a multi-page playground you can create a custom navigation markdown for a page in below format and also remove the
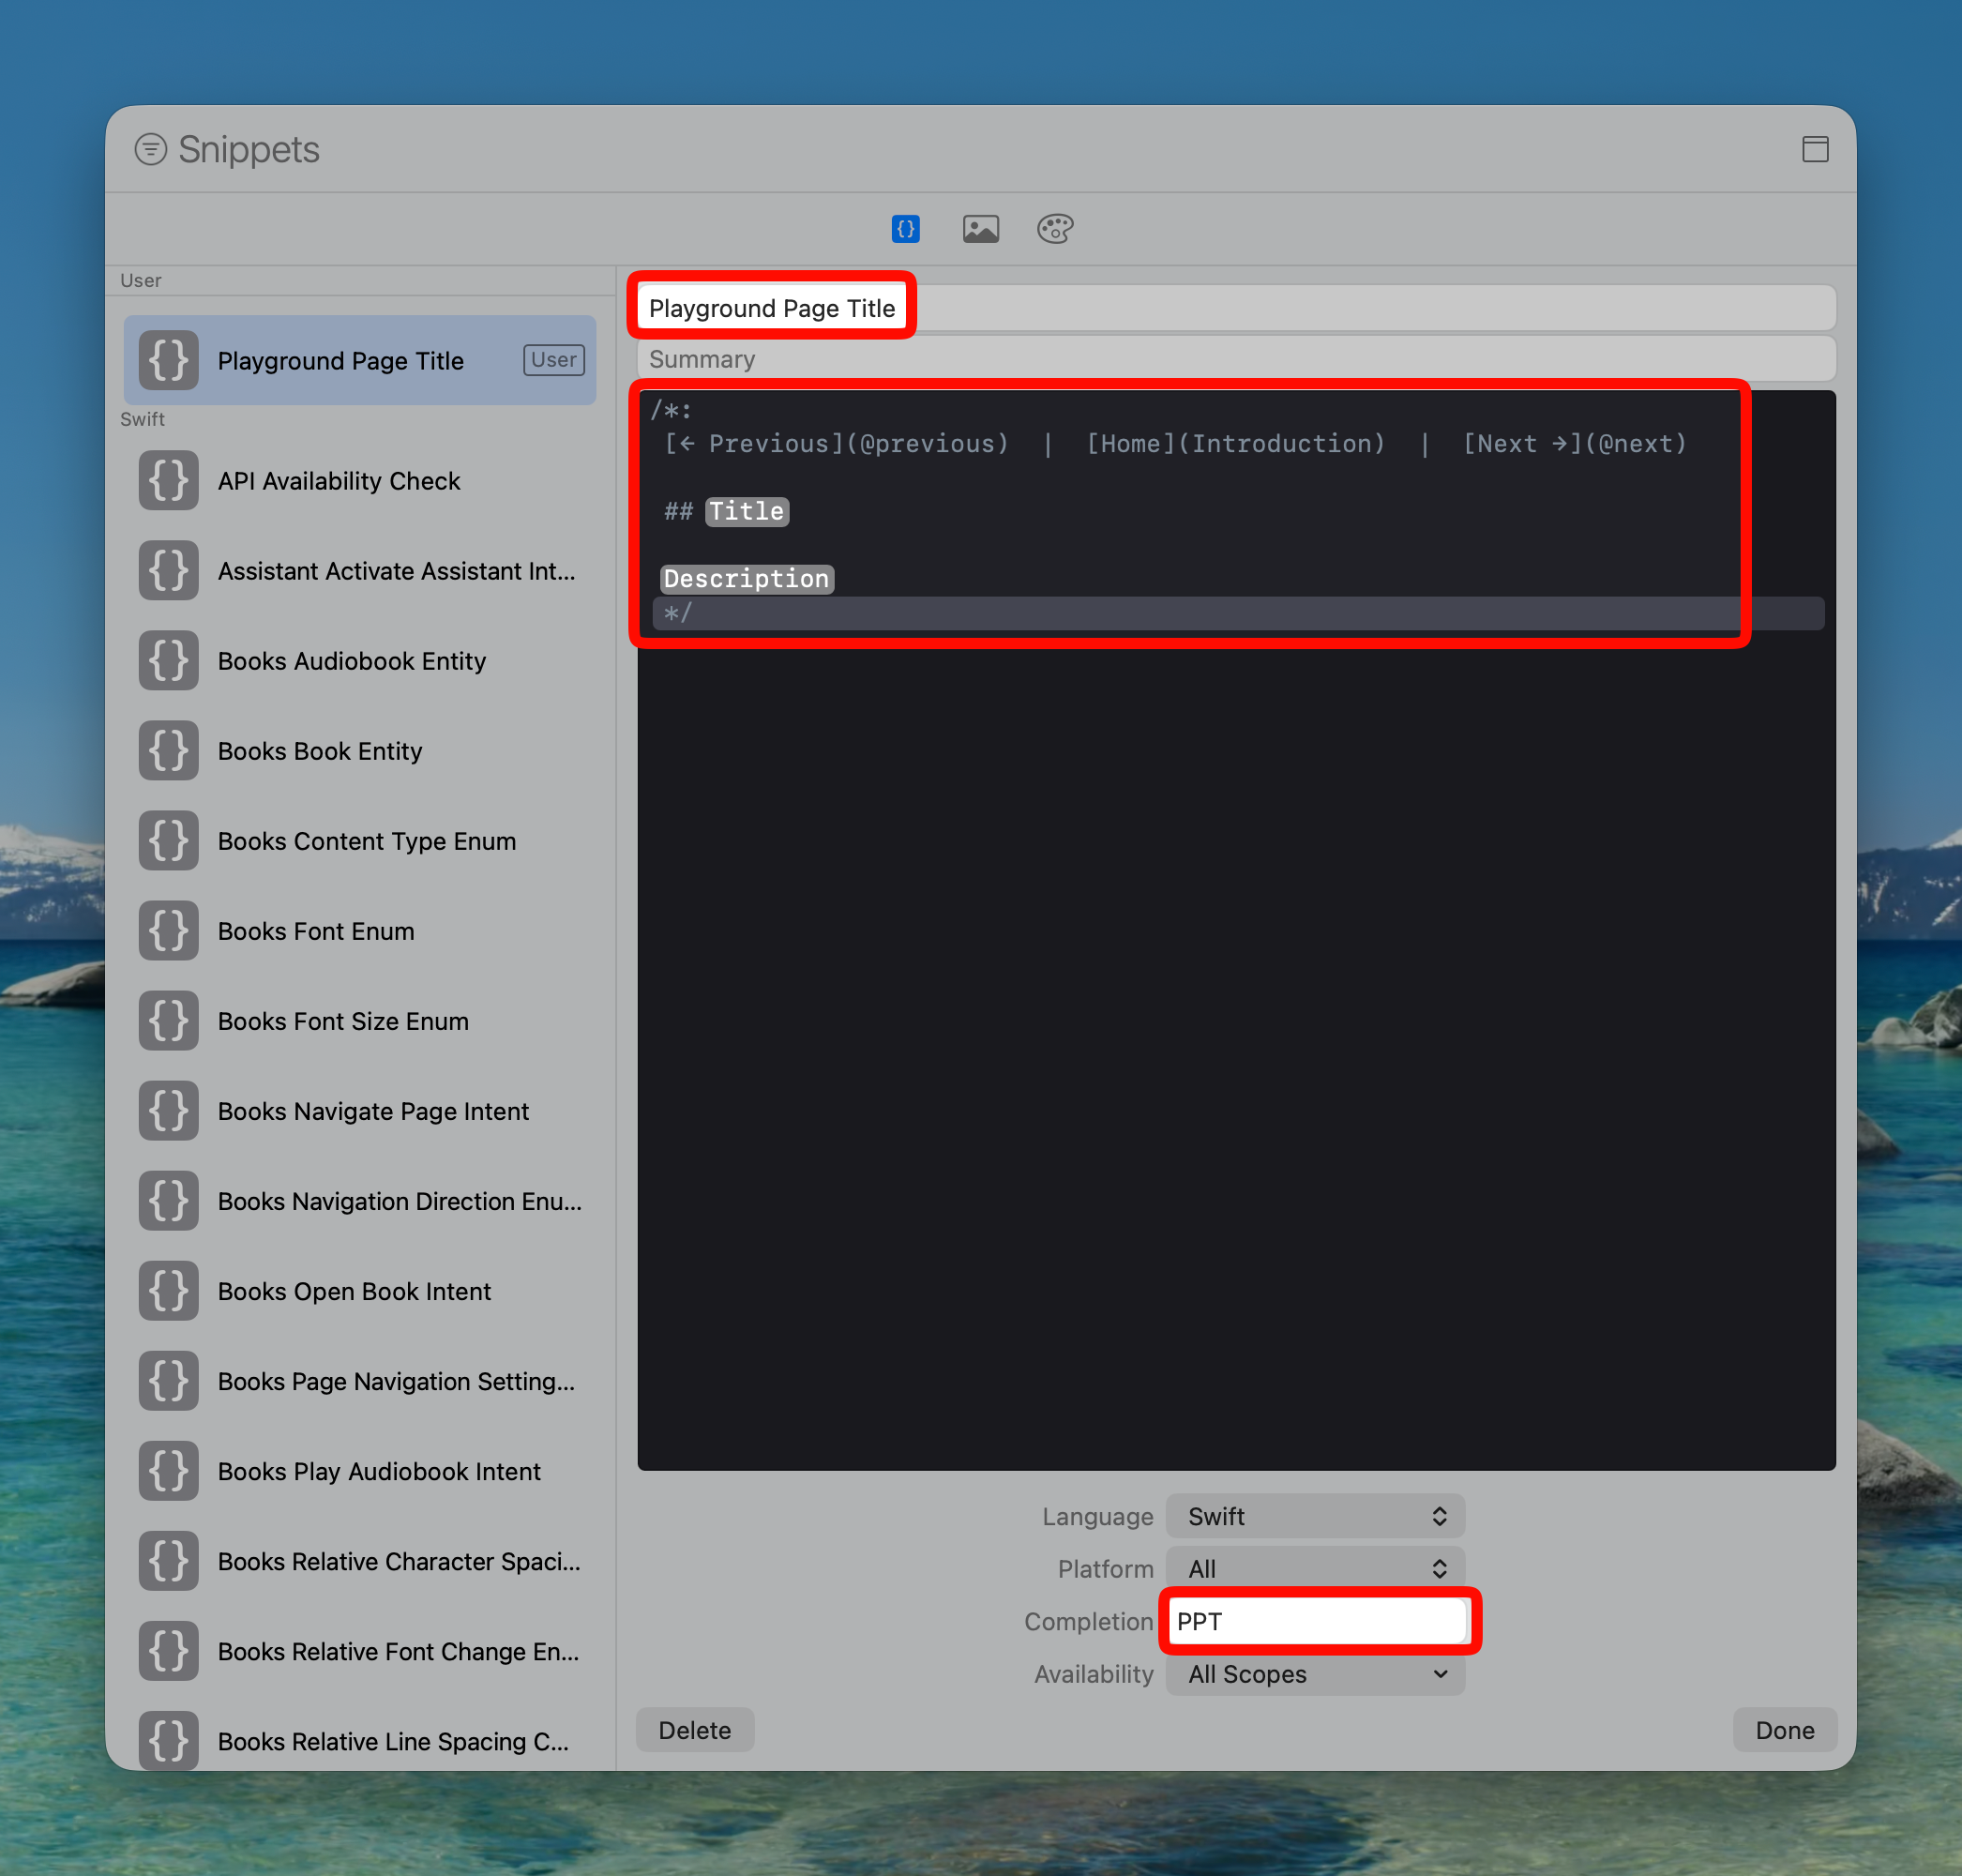
//: [Previous](@previous)on the top and//: [Next](@next)in the bottom of the page to keep it cleaner./*: [← Previous](@previous) | [Home](Introduction) | [Next →](@next) ## <#Title#> <#Description#> */You can add above as a Code Snippet by using
Editor -> Create Code Snippetand adding a shortcut as shown below: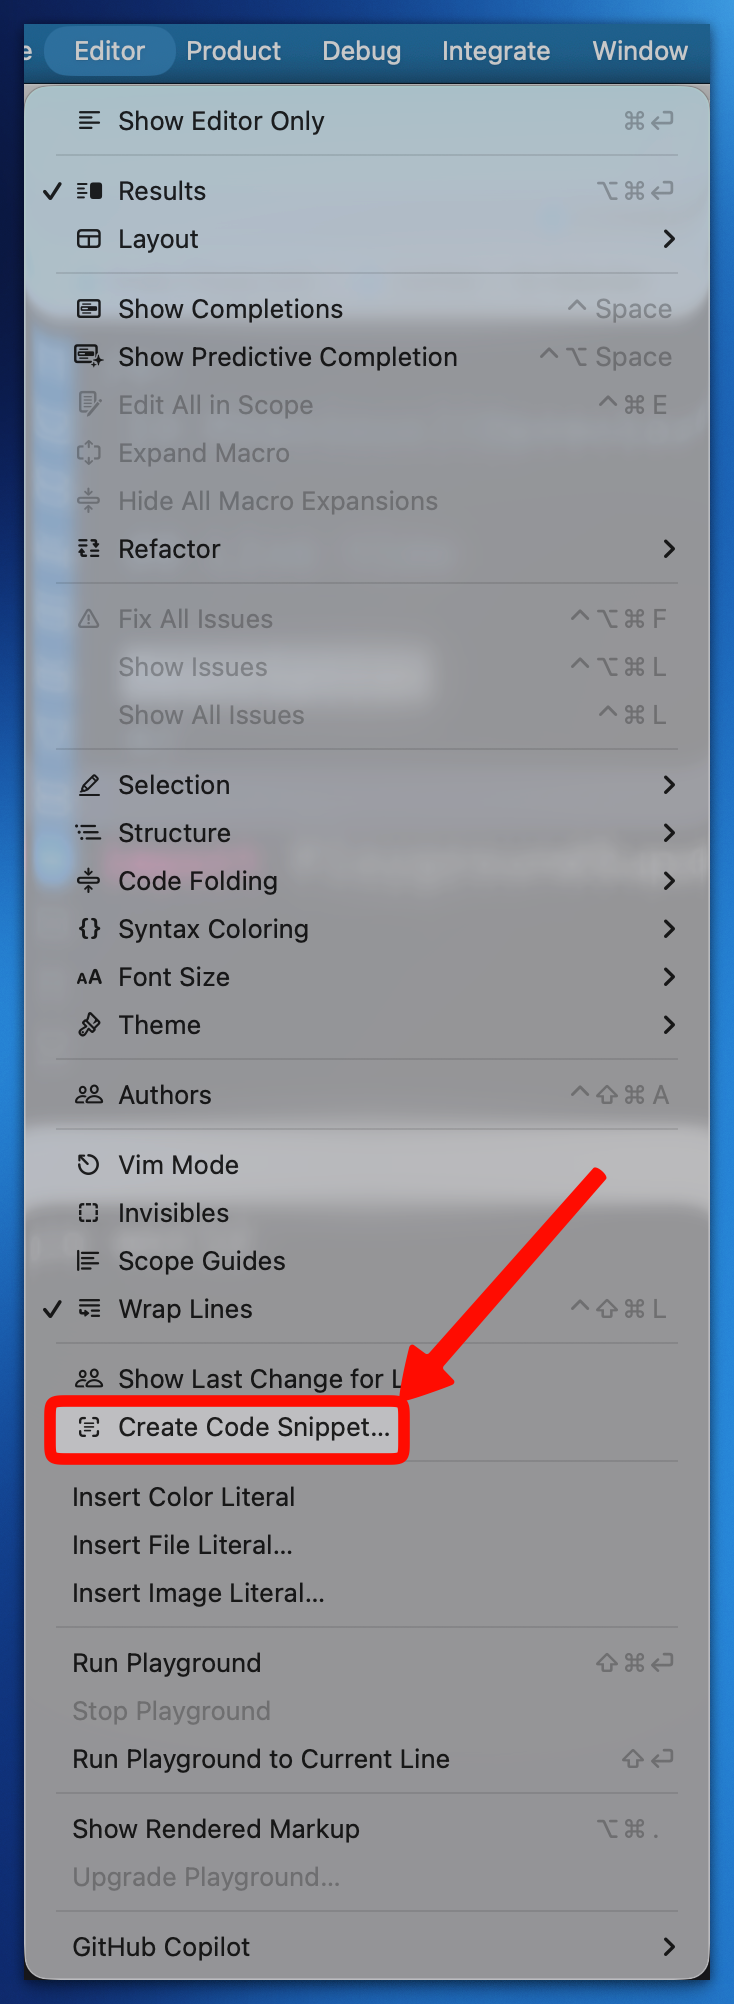
You can navigate to a specific page by directly specifying the page name
[LiveView SwiftUI](LiveView%20SwiftUI). We are using%20here to denote the space.
Exploring packages and frameworks
- A standalone
.playgroundcannot import a Swift package. Forimport SomePackageto resolve, the playground has to live inside a workspace that also contains the package, or inside the package itself - and “Build Active Scheme” has to be ticked in the playground’s settings. This catches people out, because nothing about the error message points at the project structure. - Frameworks are a different story:
import CryptoKit,import NaturalLanguageand friends work in a standalone playground, which is what makes it the fastest way to try an unfamiliar Apple API.- One exception worth knowing:
import AVKitfails, because it can’t resolve itsCoreAudioTypesdependency in the simulator runtime.
- One exception worth knowing:
- Adding a playground to a library you maintain is a genuinely good use of this - it gives you interactive documentation that runs, instead of a README with code nobody can execute.
Xcode Playgrounds vs the Swift Playgrounds app
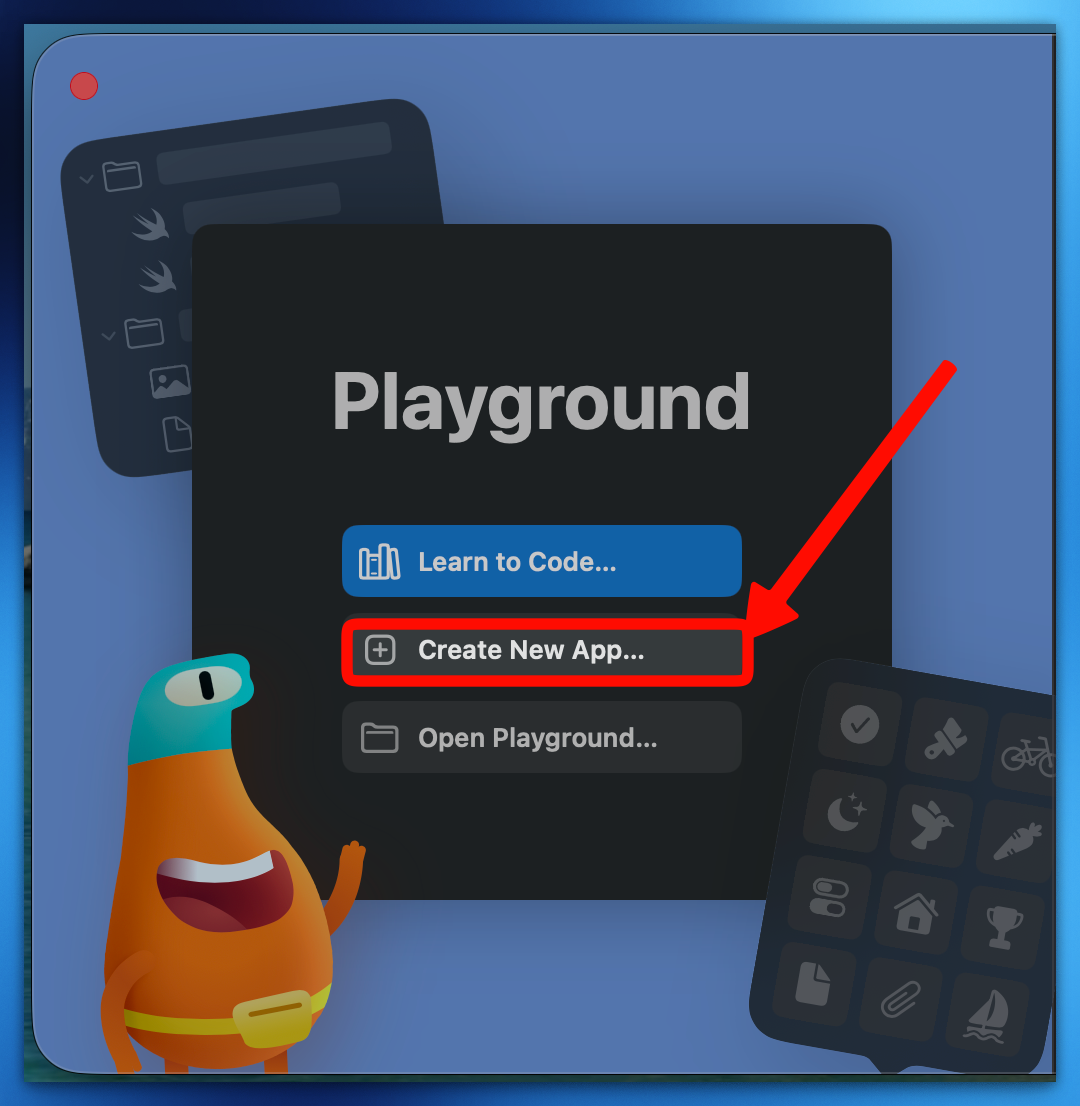
The official way to create a new playground app is to open Swift Playground app on your Mac and select “Create New App” or go to “File → New App” or ⌘N (i.e. CMD + N):
.playgroundvs.playgroundbook.playground:- Playground project created in Xcode
- Can be directly opened in Xcode and Swift Playgrounds app.
.playgroundbook:- Playground project created in Swift Playgrounds app.
- Can be opened only in Swift Playgrounds app.
- Saved by default in the Playgrounds directory on iCloud Drive.